Creating Trackable Power In a C5 Corvette
When it came to modifying my C5 Corvette, I'd always put power pretty much deadlast on my modifications to-do list. It seemed like a wise choice to help keep the car as reliable as possible, and speed would be better picked up other places like chassis, braking and aero. After my 27th and 28th track day though, where I was stuck behind Mustangs that woul crawl through the turns and then obliviously time travel away on the straights... I knew the time had finally come to upgrade power. The LS is plenty capable of hanging, it just needs a bit of love!
So, the goals were simple: Add power, keep reliability, don't go broke.
I could get a crate 515hp LS3 and just chuck it in there... but I'd go broke both in the cost of the motor alone along with all the downstream parts that would start to suffer from that much additional power.
There's also the boosted folks. Boost however rarely ever holds up at the track without a metric ton of supporting mods, and it definitely doesn't exude reliability either. I've yet to see a boosted C5 Corvette not puke it's absolute guts out after 15 minutes on a track with even a novice driver pushing it. The few boosted Corvettes I've seen in time attack events that don't puke their guts out have got absolutely massive amounts of support mods to go with them... and still don't even run for a full 20 minutes.
The answer was therefore obvious, and not exactly original. Heads, Cam and Intake (HCI) along with exhaust.
Ballpark plans to accomplish this goal:
- Phase 1 / 2024
- Add long tube headers and exhaust. Adds notable mid range power, and frees up power everywhere really.
- LS6 intake Manifold.
- Remove air pump.
- Phase 2 / 2025
- New heads (Factory 243 factory heads).
- New Cam (Tick Performance SNS Torquemaster Stage 3 cam).
- Upgraded Roller Rocker Trunion Bearings.
- Upgraded springs + Hardened Pushrods + LS7 style lifters.
- Larger 40lb fuel injectors.
Initial State of the Car:
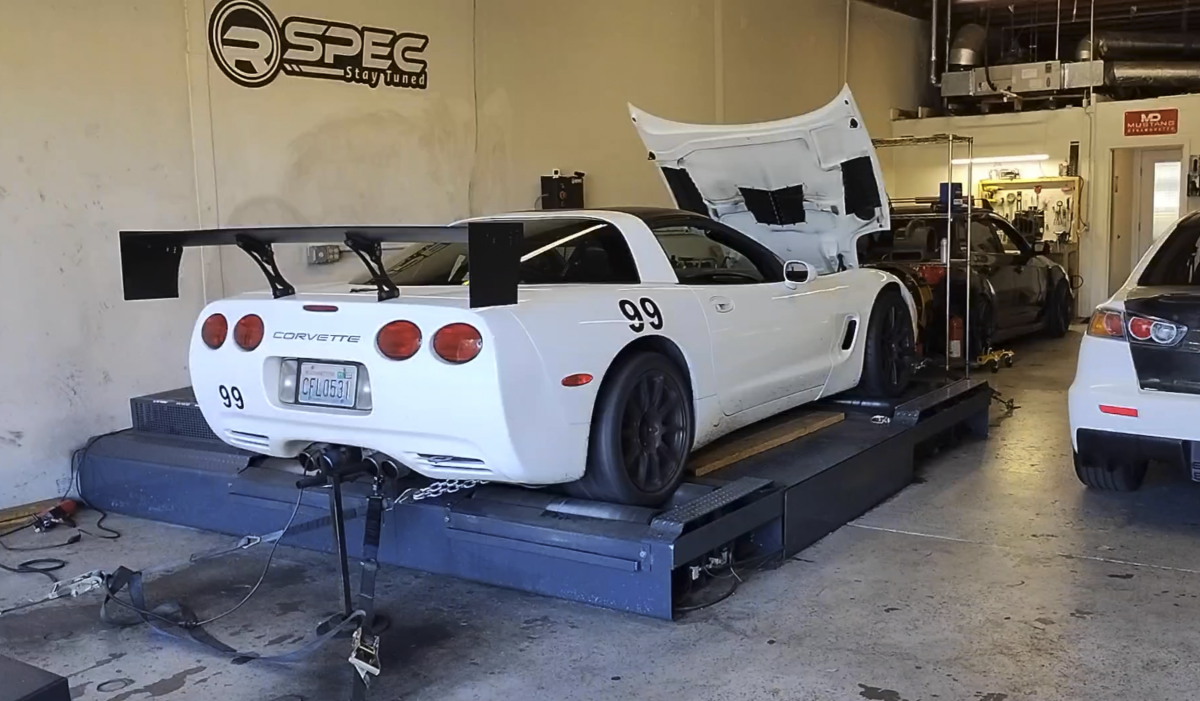
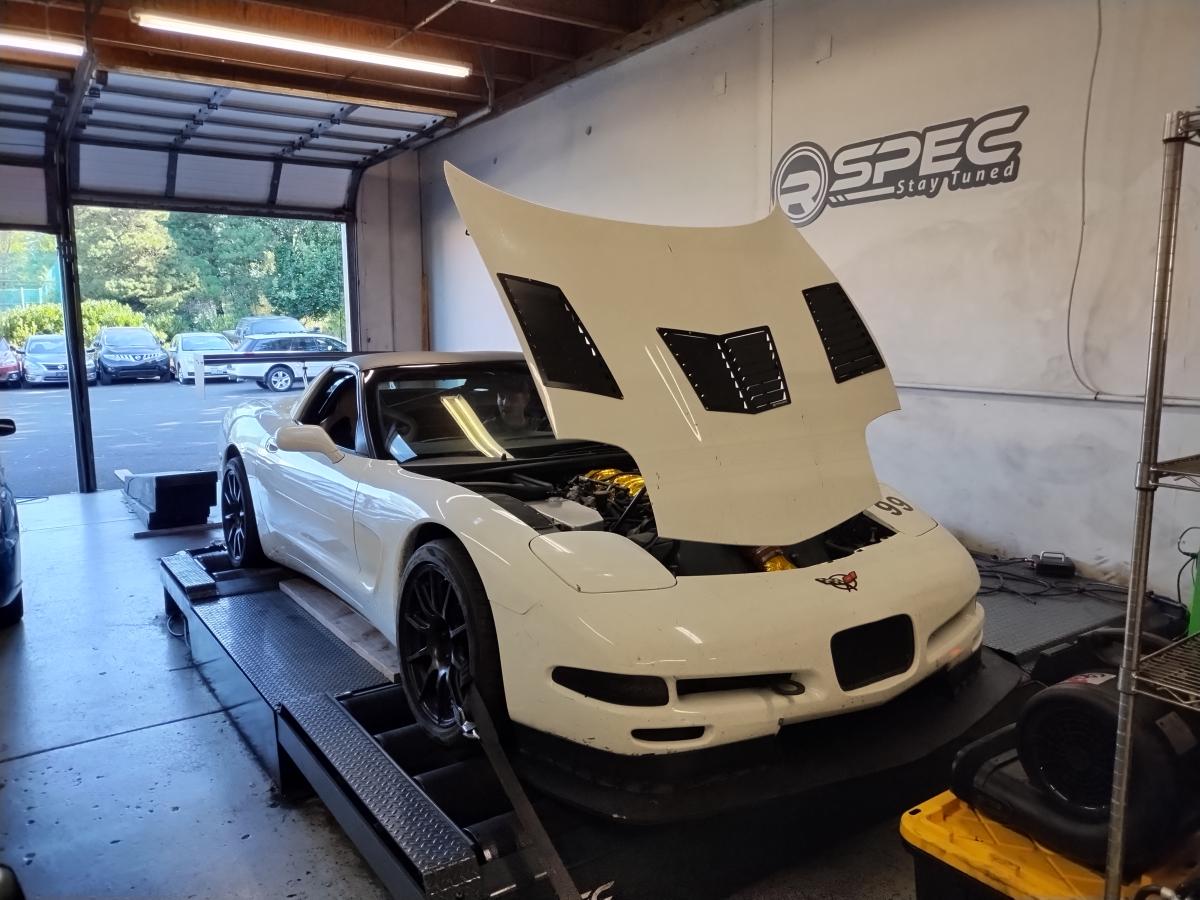
So if I'm going to be even semi scientific about this, I'm going to need to establish a baseline. I consequently reached out to R-spec tuning here in the Portland Metro region to get the car on their Mustang dyno to get some numbers. Now, it's worth noting that the Mustang Dyno itself reads about 15% lower than Dynojet dynos, so just bear that in mind when comparing these numbers to other numbers.
Coming into this tune, the car had only the following power related modifications:
- C5z06 Titanium Exhaust W/bypasses.
- Ebay Air Intake with dual 3" K&N Filters above the radiator ducting, quite possibly worse than OEM.
- Small ports added in radiator ducting to help direct some fresh air to air filters.
- Aluminum Flywheel and LS7 Clutch (probably freed up some rotational mass).
The modification list above is pretty inconsequential for power, but worth noting for any folks looking to compare!
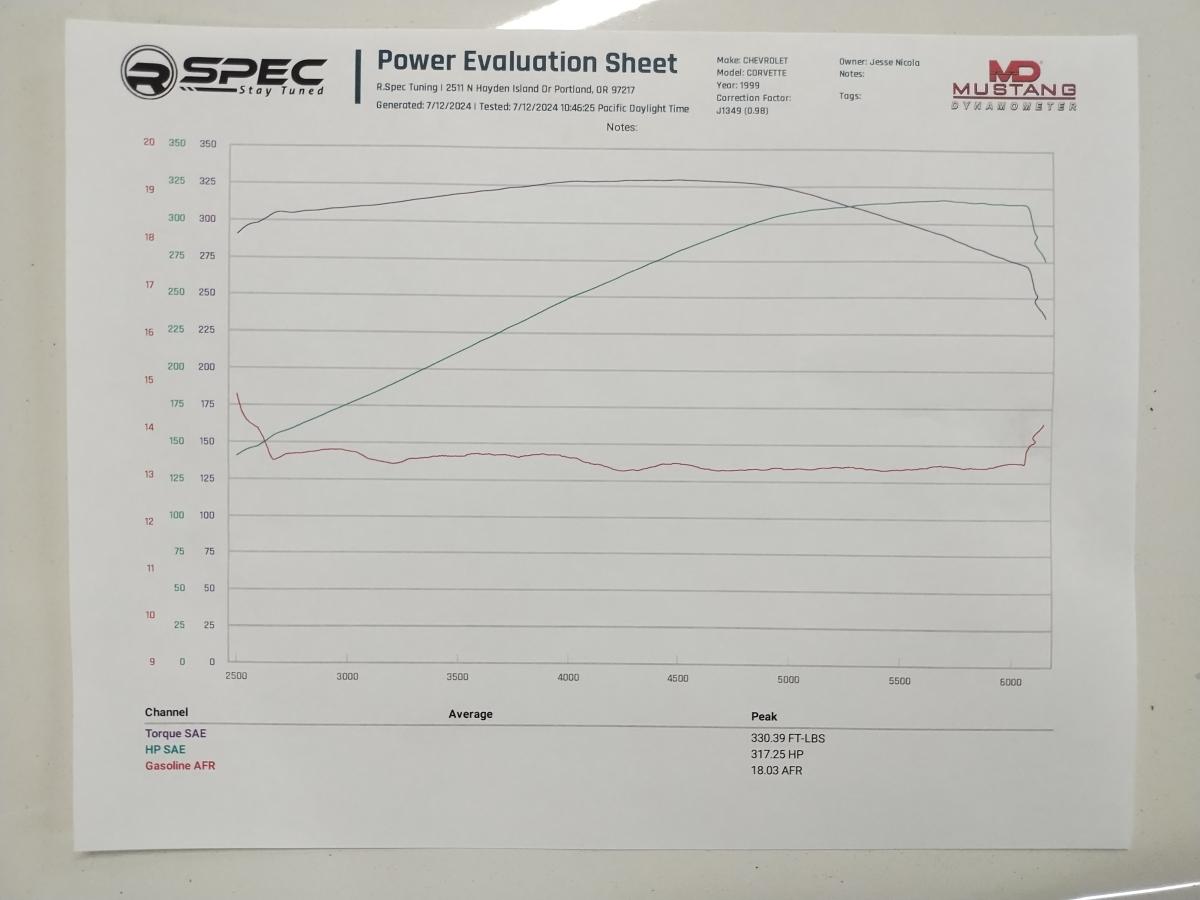
We went through 3 pulls, and with some tuning got a best value of 317.2 Horsepower, with 330ft/lbs of torque. We had a few issues initially with the car pulling a very aggressive 8 degrees of timing out of the car, but elevating the fan blowing air on the car to actually blow into the air intake area (IE: Above splitter, below bumper) yielded a 10 degree decrease in intake temperatures and the car only pulled 2 degrees of timing out at darn near peak. Average AFR was about 13.4, which was probably reading a little lean since it was at the exhaust and post the catalytic converters.
Phase 1 Modifications and Dyno Tuning
So the phase 1 plans were to modify the car enough to stay within 2024 SCCA Max 2 Class rules, which pretty much limited me to an intake manifold, IAT considerations, and exhaust.
Intake Manifold
The first thing I went with was an LS6 intake manifold. These are renowned for picking up 10-20hp, so I figured why not just chuck one on! I also needed to change out the oil pressure sensor which was behind the intake manifold, so might as well get going on the intake manifold!
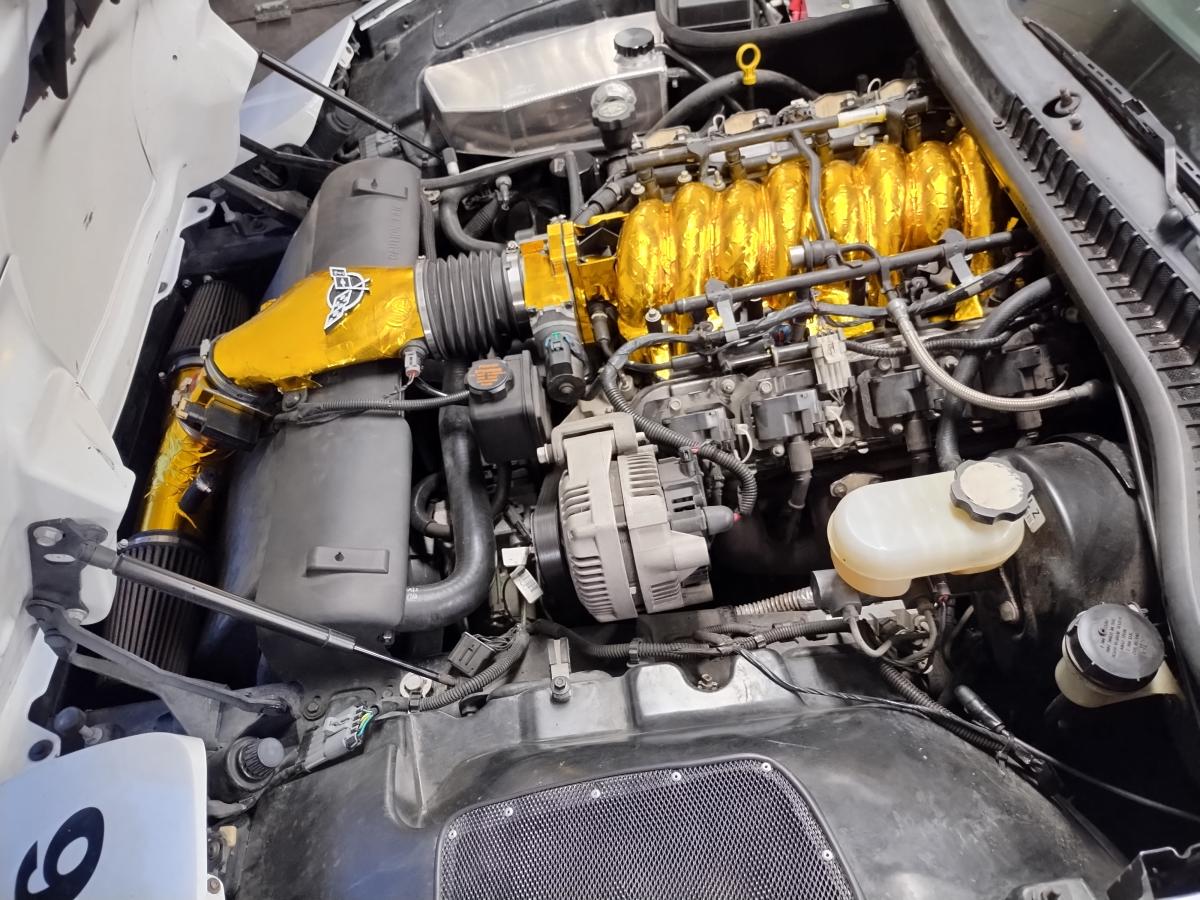
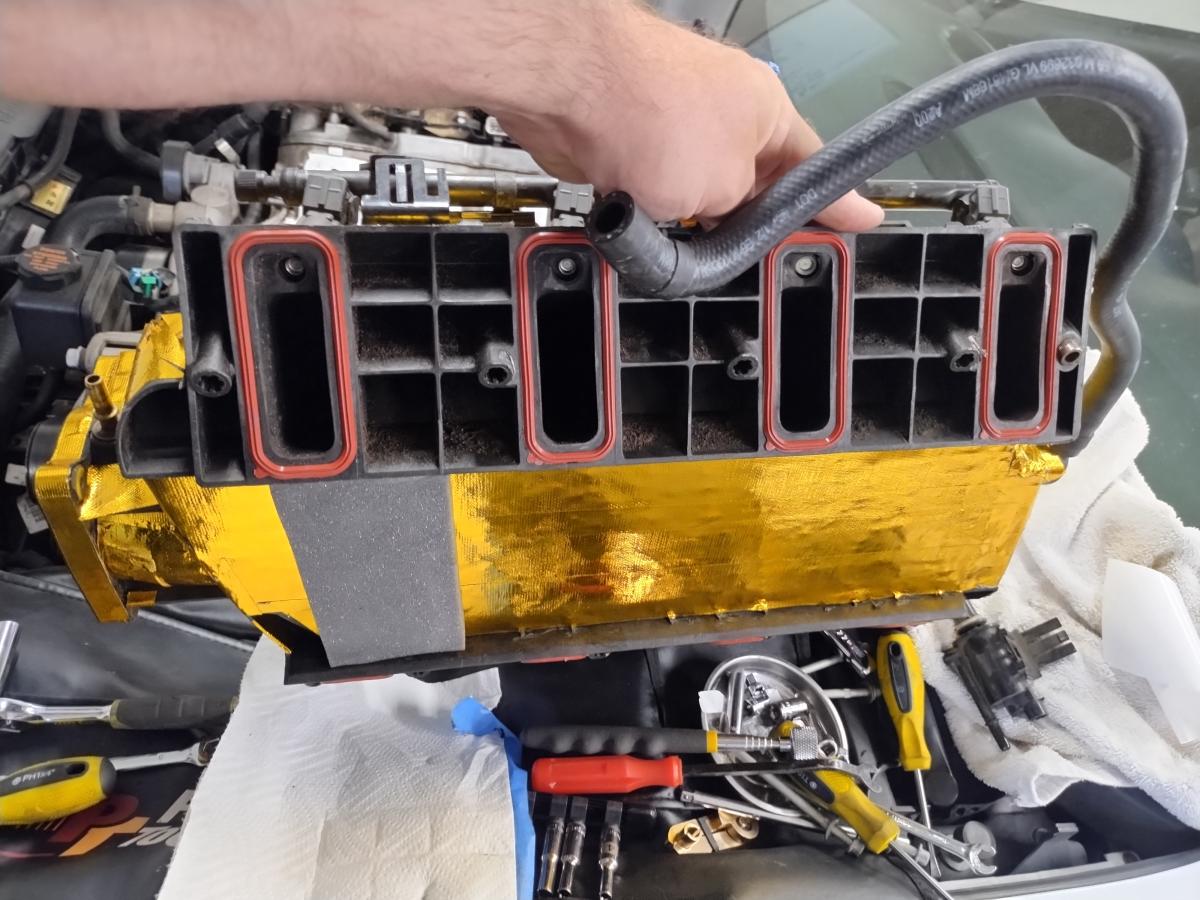
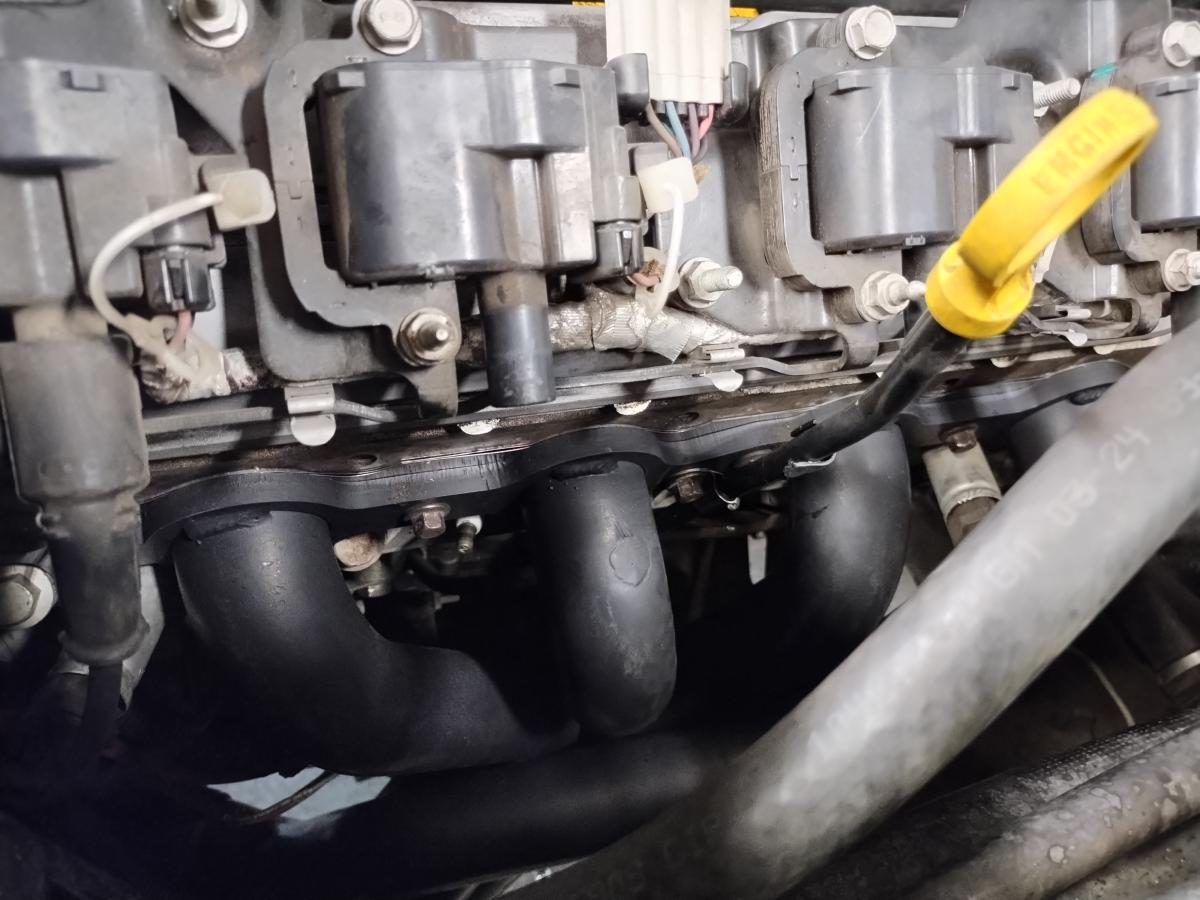
I picked up a used LS6 intake manifold, with fuel rail and injectors. I also picked up a heat blanket setup to go between the intake manifold and the block, but unfortunately it wouldn't work while keeping the coolant crossover pipes beneath the manifold. Infact, the intake wouldn't work at all without cutting out all of the ribs below the manifold. I should have stopped to grab pictures, but I was so frustrated by the time I'd dremled them all off I just called it quits and moved along.
As you can see in the pictures, I also wrapped everything that I could with heat tape. At $8 or so for 30 feet of reflective heat tape... it was a negligible cost to add on and see if it reduces intake air temperatures at all. I doubt it'll do much, but eh worse case scenario I look cooler. I also couldn't fit the thermal blanket I'd bought that is supposed to insulate the intake from the block, so I just covered all of that in thermal tape as well!
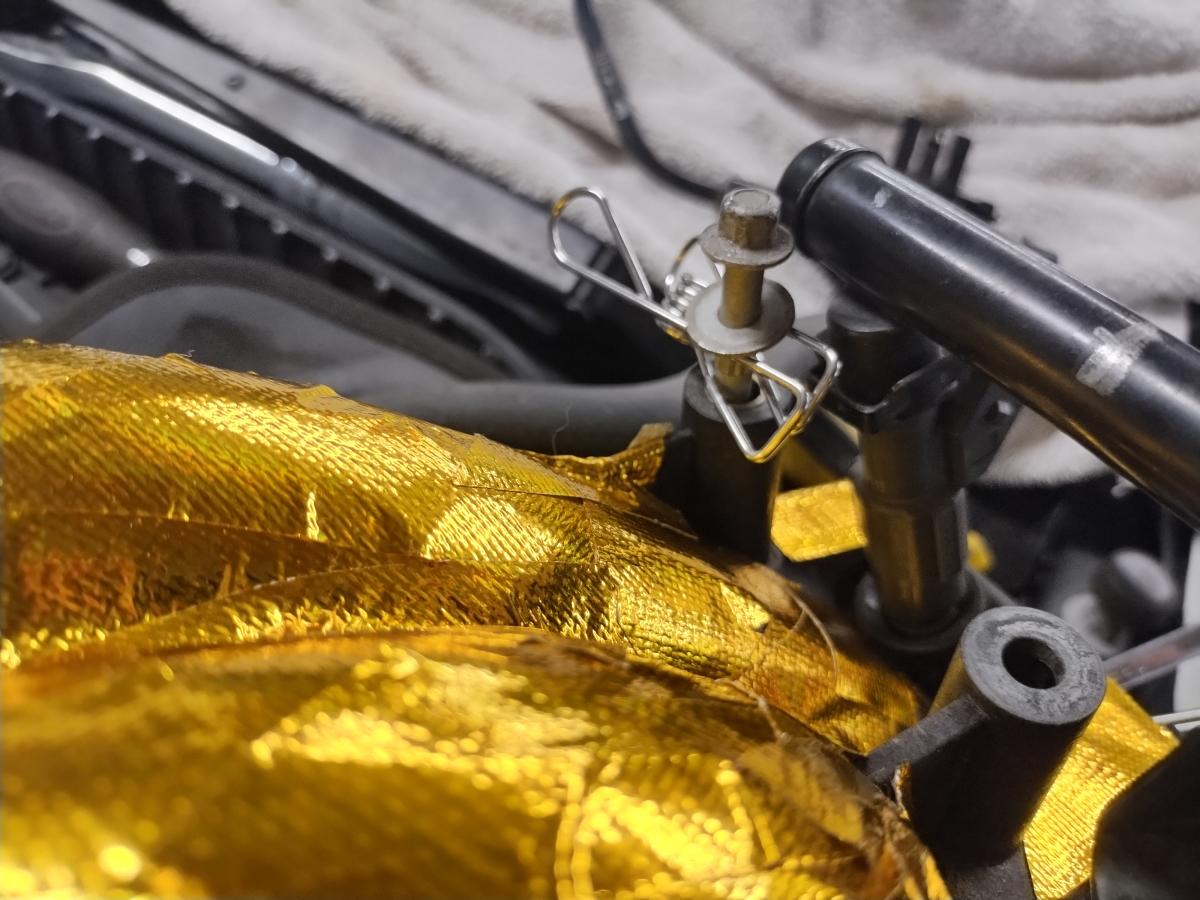
One minor "pro-tip" for you guys, is that folks complain a lot about finagling the rear most bolts of the intake manifold into place. Welp, if you use a clothespin on them, they stay at just the right height and make install easy!
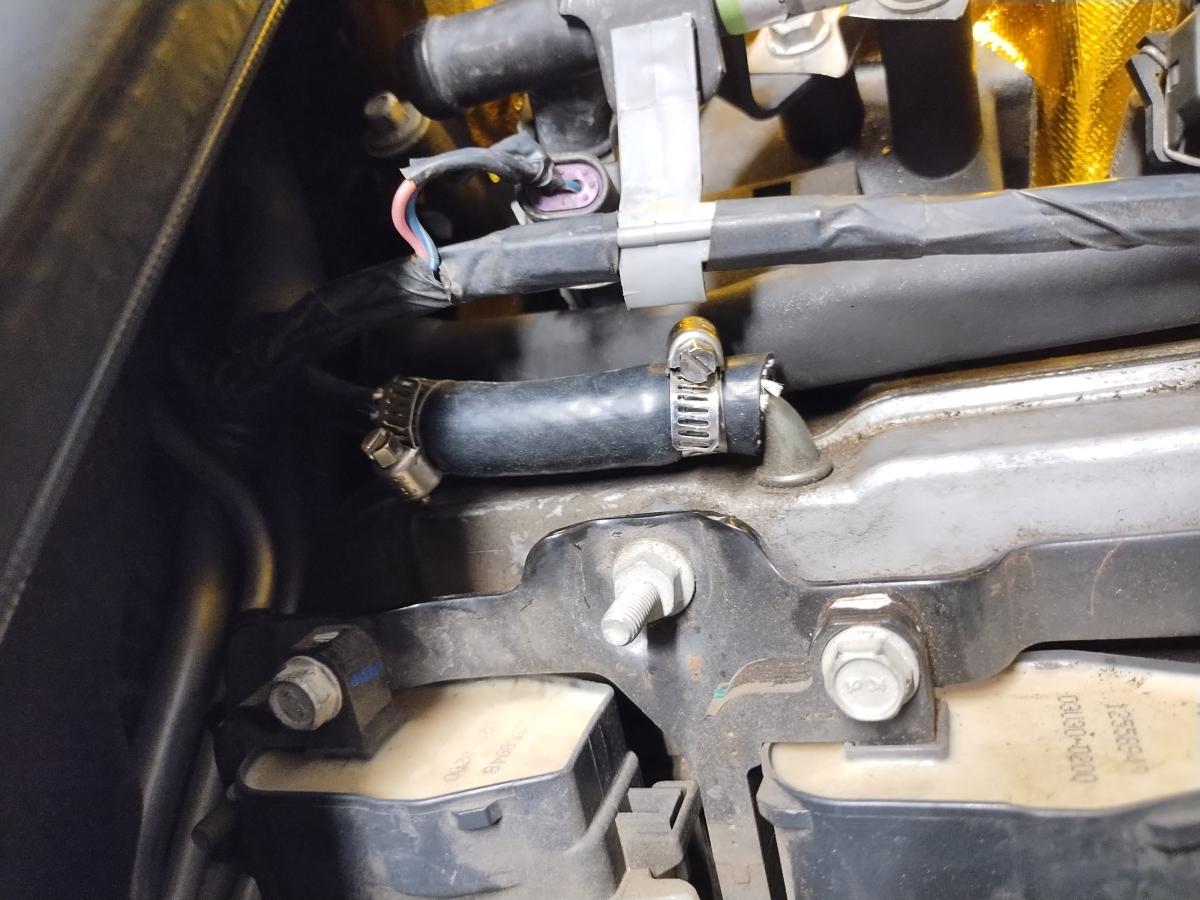
One thing to note for those tackling these jobs yourself... these cars are nearly allover 20 years old. The old rubber lines or connections will often die their last death on removal, and if not then surely on reinstall. Having extra lengths of hose around and hose clamps will save you a lot of frustration when things die and you have to replace them.
How did it do at the track prior to tuning:
36th Track Day @ PIR (link)
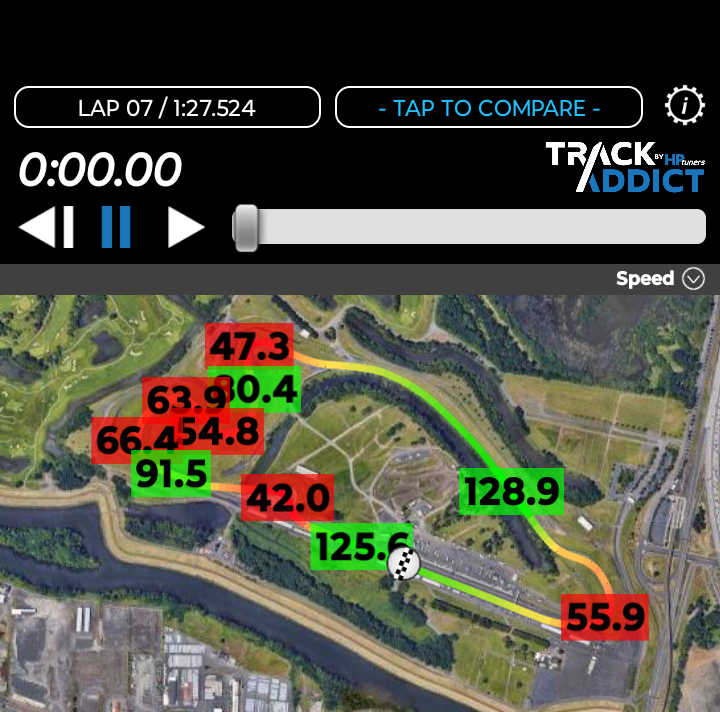
Despite a lot of traffic in the advanced group (and a lot of non-advanced drivers) I was able to run a 1:27.524, beating my previous PB of 1:28.764. I can't unfortunately fully attribute that to recent modifications as the temperature was 25 degrees cooler for this event providing for increased traction and likely more power just from reduced ambient temperatures.
Comparing apples to oranges though... Top speeds on both straight was increased from my previous PB time. Back straight was up 2.9mph and front straight was up 3.4mph, so not insignificant gains. Whether that can be attributed to a slight increase of power with the LS6 intake or the different gearing of the Z06 transmission which was changed since that last time, or just ambient temperatures... we'll never know as my data logging isn't good enough unfortunately to have captured IATs last time! I'll know more after the next event at the Ridge though when I can compare top speeds though that were both accomplished with the Z06 transmission, leaving just recent power modificaitons for determining differences.
I unfortuantely was going to test this at the Ridge, but due to logistics complexity my next day at the Ridge was in our Lemons Honda Accordian, so we'll never know for certain just how much gains were to be seen there from the intake alone.
Long Tube Headers and Dyno Tuning
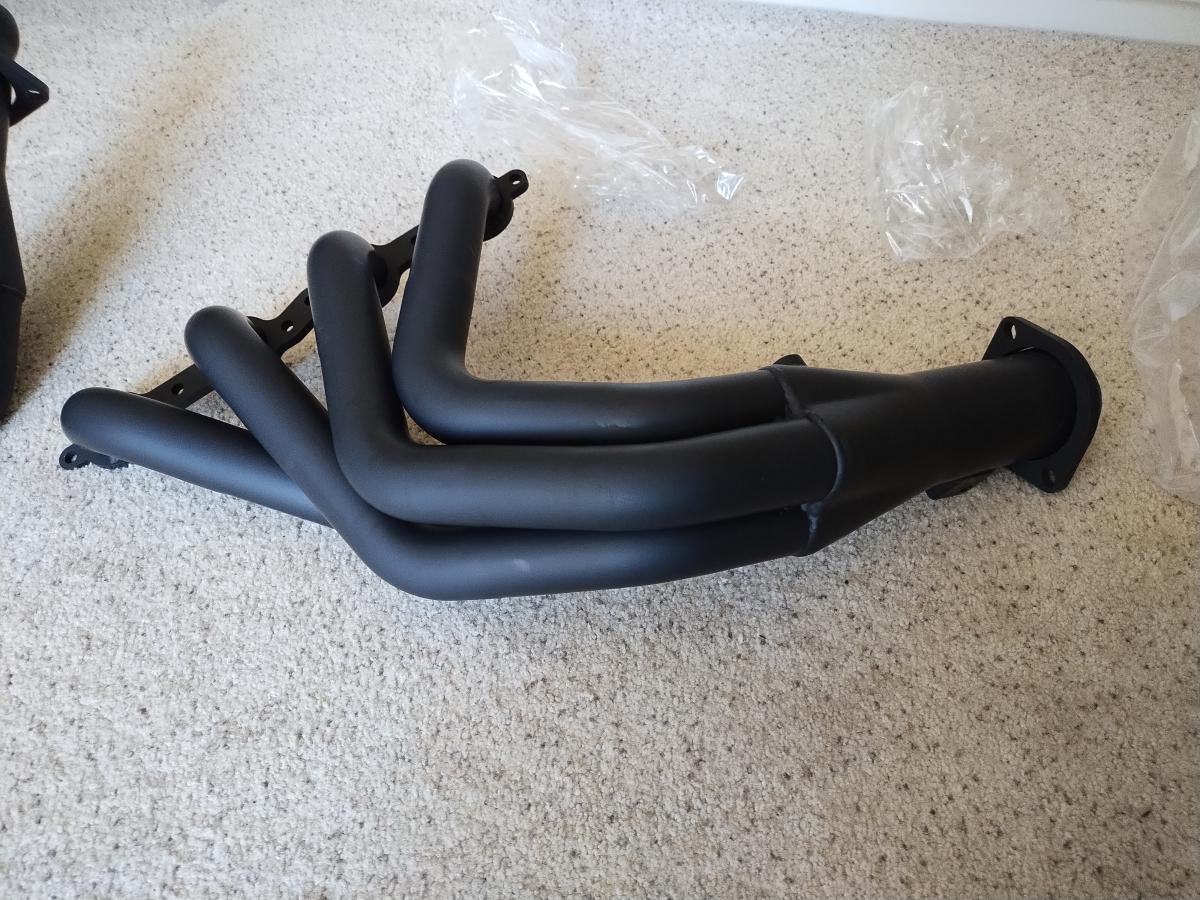
So exhaust is definitely one area you can pick up some power on the C5 Corvette, and long tube headers are specifically renowned for increasing mid range power notably. I happened to have a friend from tracking C5's that had a pair of Kooks 1-7/8" long tube headers he wasn't going to install. I picked them up for a reasonably enough price, got them ceramic coated and proceeded to install them myself.
Installing the headers unfortunately was an ABSOLUTE nightmare, but to be fair to Kooks I can't fault them for the headache. Apparently Kooks improved their design in 2013, and these weren't the improved design. Plus when I contacted Kooks they were pretty nice and gave me a heads up it was an older and "less refined" design, and offered me a notable discount to get their new stuff. Me being the dummy I usually am, I decided to power through what I've got. I definitely paid dearly for all the extra work that involved unfortuantely.
I won't bore you with details about how to install these old headers. There's plenty of forum content. I'll just say we had to pull EVERYTHING on the drivers side. Brake master cylinder, alternator and alternator bracket, oil filter and oil cooler adapter plate, valve cover gasket... heck we even lowered the subframe and then rotated the engine over with a 10 foot 2x4. The install of the drivers side alone took 12 hours and it wouldn't have been possible without my friend Orion's help... so god speed to you if you happen to get a pair of these old kooks headers.
The dyno day unfortunately was a bit of a bust, which was entirely my bad. I didn't recognize that there were two oxygen sensor ports on the passenger side header. I installed the header first, and then went to install the oxygen sensors, and the secondary port was way out of sight, and honestly not even in a place I think you could put a wide band O2 sensor. So, I went to the dyno and one bank was reading way off and something was up. We tried all sorts of stuff trying to figure out the issue, but ultimately it wound up being entirely my bad. We got a block off in the open port and with just an hour left until closing time we got the tune to a decent state, but the tuner openly admits we could find 3-5 more horsepower throughout with some tuning. They recommended I just come back to chase the additional power gains as part of whatever my next set of modifications is.
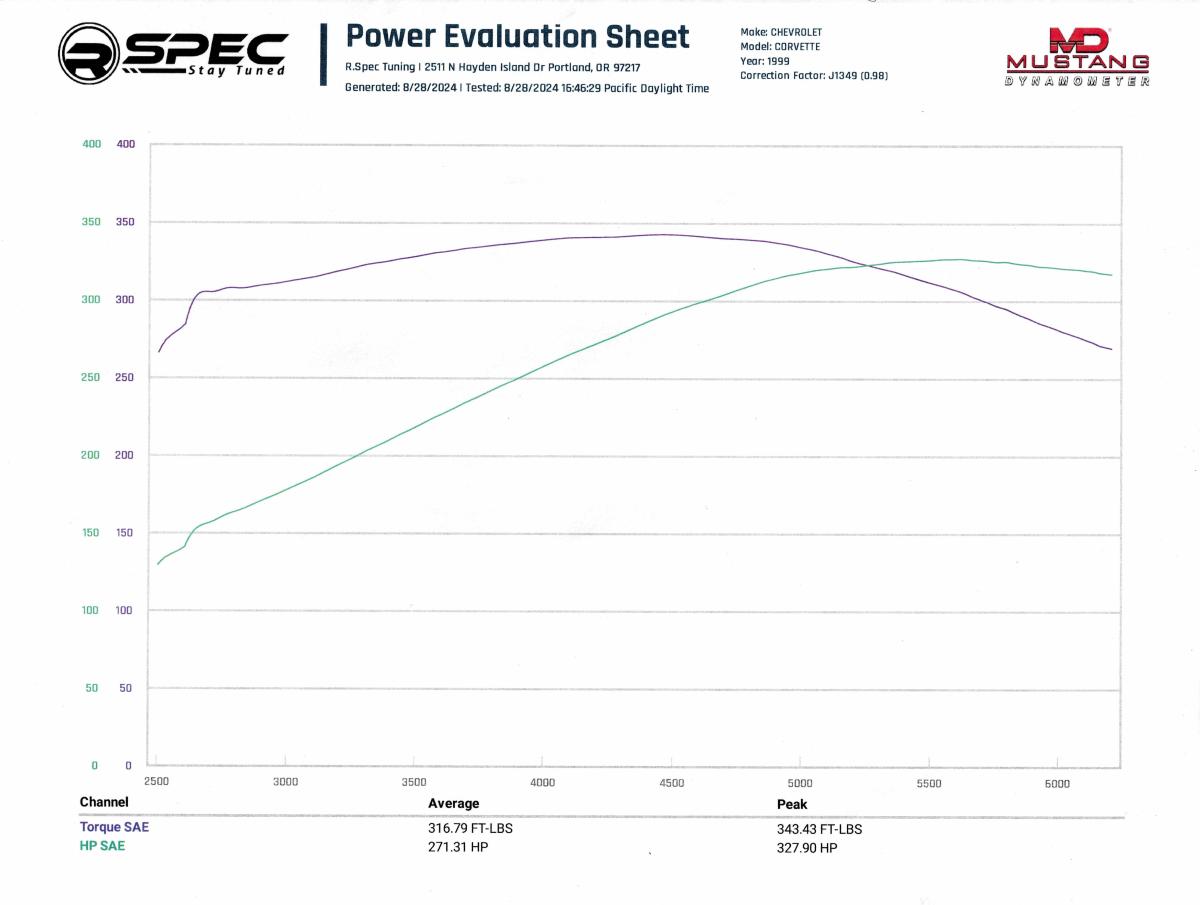
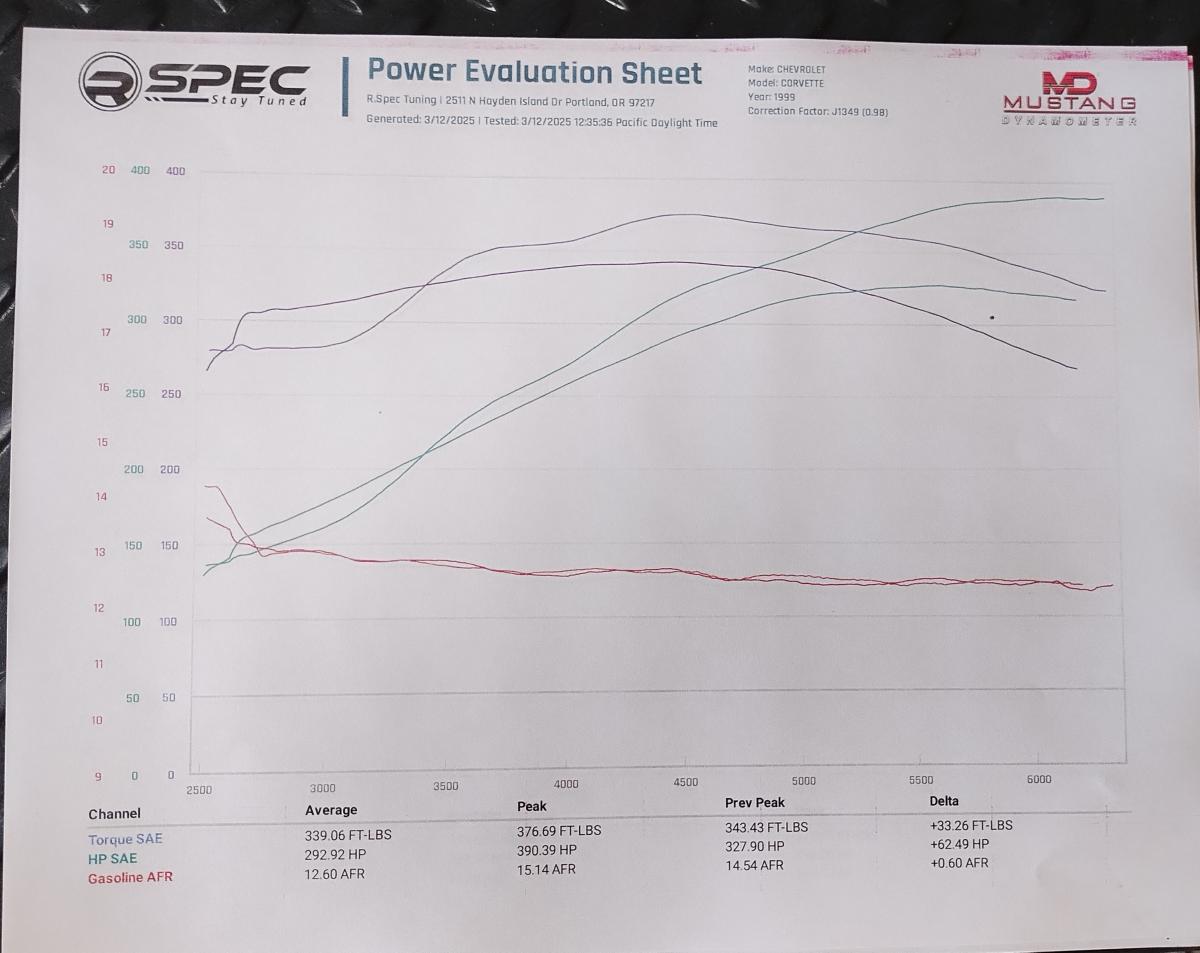
Above is the data from just the best pull today. 343.43 ft lbs of torque and 327.9 horsepower. The torque curve is also pretty generous, as it the power band. Keep in mind this is from a Mustang Dyno, which reads 15% lower than a comparable Dynojet dyno.
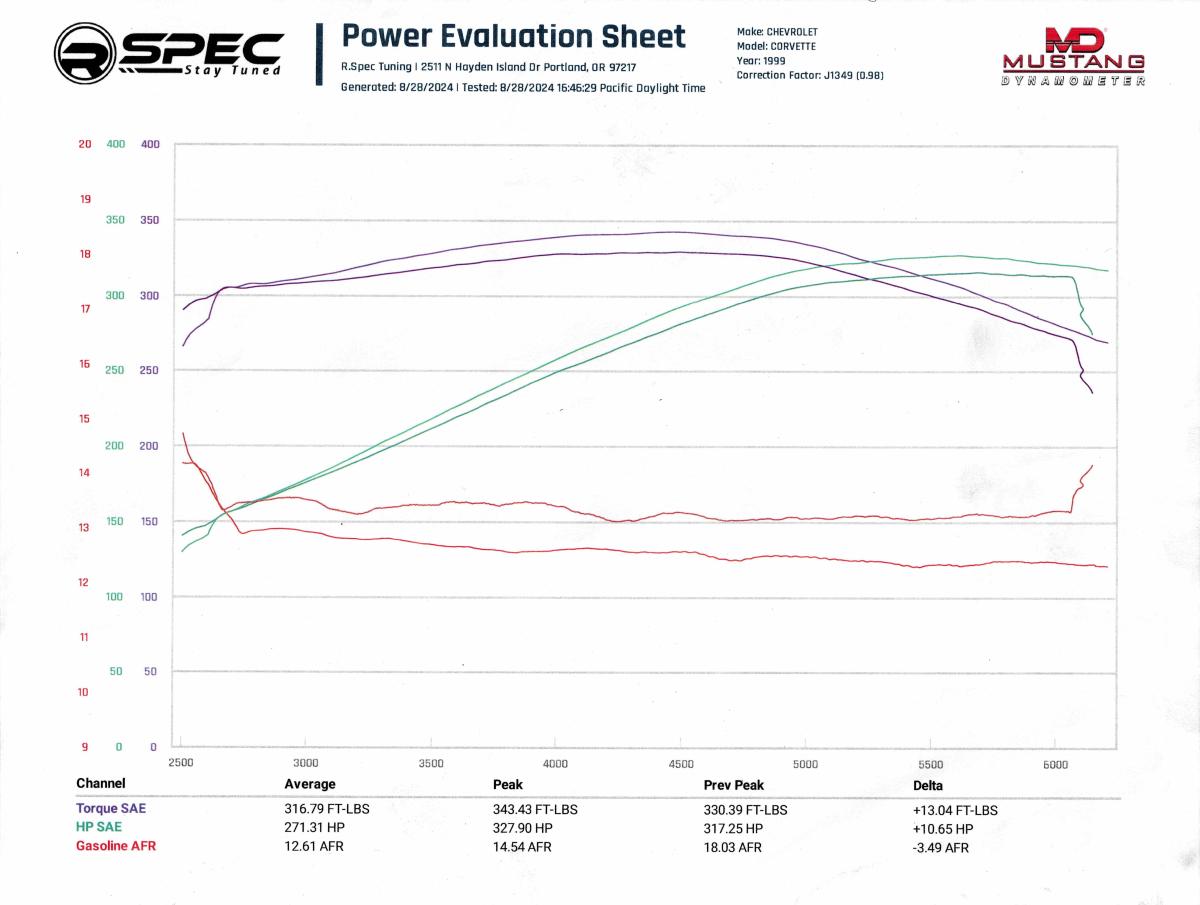
Comparing the data definitely shows where the upgrades really shine. You can see there was a significant boost in mid range torque from run to run, along with a notable gain in horsepower up top as well. The air fuel ratios were also notably improved, although some of that can likely be attributed to the air injection system being removed from the car.
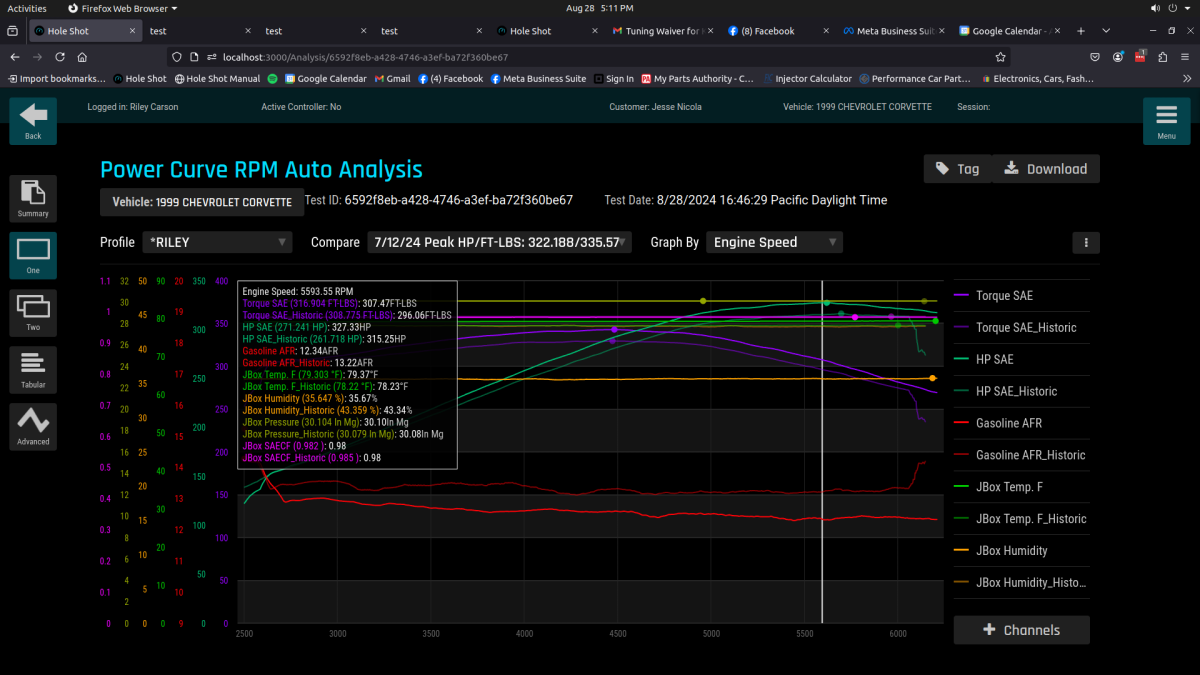
One thing that is important to note when comparing data is that details like ambient temperature and humidity are the same. The difference temperature wise between the first dyno session and this tuning session was 1.2degrees fareneight, with 8% humidity difference. Fairly negligible differences, resulting in the SAECF (correction factor) being 0.98% for both pulls.
Improvements After Full Exhaust, Intake and Tuning
It took a while for me to get back to PIR, but on my 41st track event and final event of the 2024 season, I was able to get back to back there for 3 sessions at a Track Night in America event.
Side by side Comparison to my old best lap: (Left new, right old)
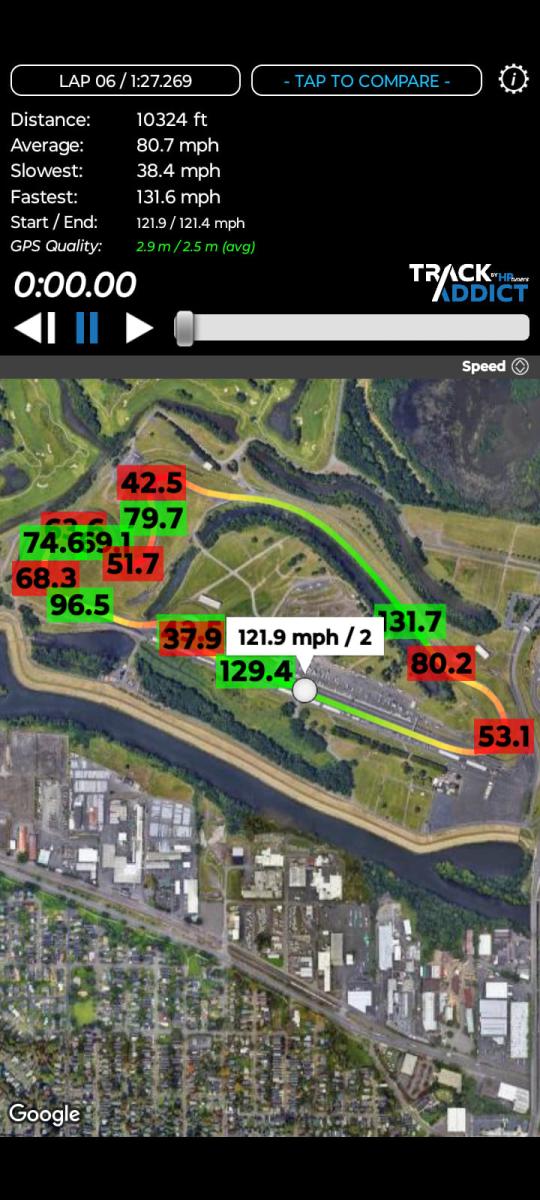
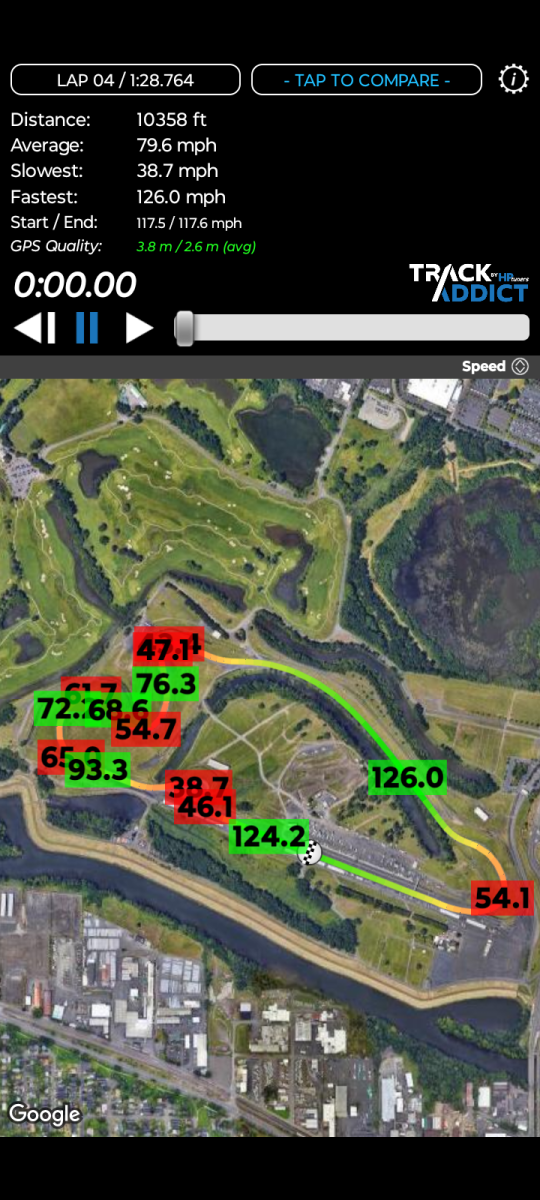
(Quick reiteration, left side is with modifications, right side is prior to modifications)
So it goes without saying that with a horespower increase, I should see increased top speeds. Here you can see it for sure with a top speed of 131.7 on the back straight and 129.4 on the front straight, a gain of 5mph for both straights. You can also see the speed difference nearly everywhere involving power. Unfortunately, you can also see my corner speeds are down. nearly everywhere, with some by as much as 5mph like the hairpin!
What changed? Well, I made some suspension adjustments, my brake pads also developed significant taper resulting in braking power reduction, and I've been experimenting to make some rear sway bar adjustments to tame the rear end which I think made the front end push. I also added some big old bump stops up front that were way too big and would definitely massively increase my effective front spring rate when they make contact and in turn cause understeer.
I'm fairly confident that with a few adjustments to my suspension, I would increase my corner speeds and thus exit speeds, in turn further increasing my top speeds on the straight aways. Still, the difference is noticeable in the numbers, and there's definitely room to improve as well.
243 Heads and Tick SNS TorqueMax Cam
So the most common mod mentioned by folks to do on the LS1 to gain power is to do a heads and cam. Specifically, 243 heads are reputed to be able to handle all that most folks will need from a naturally aspirated setup, and then an accomponying cam for your goals. In my case, I wanted good torque through most of the power band and a solid gain in peak horsepower. That said, I didn't want to compromise too much torque down low, nor did I want to spin the engine out to 7000rpm if I didn't have to.
I'll have a dedicated article on my heads and cam install soon, but for now, here's the jist of the job and what the results were:
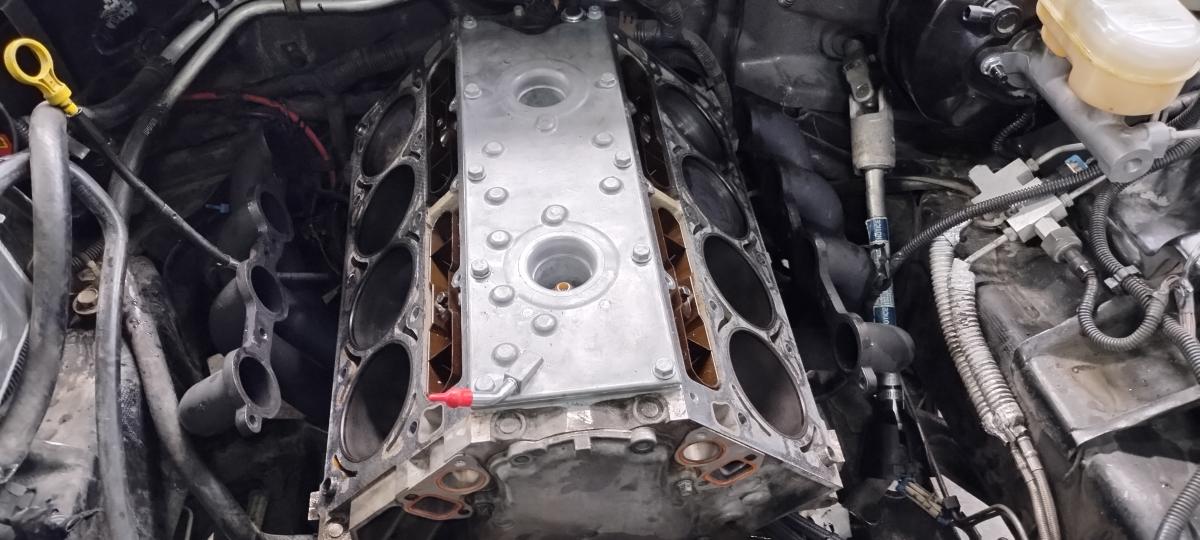
The short version of what I did was get some 243 heads locally at a good price. I took them to my local machine shop where they made sure they were flat and good to go. I then upgraded the springs and seals in the head, along with tackling a bunch of other support mods along the way like the LS6 Valley Cover, upgraded rockers to trunnion bearings, new LS7 lifters... all the usual supporting mods. It's also worth noting that I went with larger fuel injectors to help ensure I was at around 75-80% duty cycle on them as well.
For the cam, I went with the Tick Performance SNS TorqueMax Stage 3 cam. The cam specs are 235/243, .630"/.610" and LSA111+2. The cam is supposed to produce power from 2500-7000 RPM, which is generally where my Corvette lives on track, though my intentional is to redline at 6500rpm and not go to 7000rpm.
 Heading down to the dyno, there was a lot of headache getting the initial starting tune right, but once we got the car happy and running on the Dyno, we made some strong pulls and delivered some pretty serious numbers.
Here you can see the difference between the last best run and the current best run. Power was up from 343ftlbs of torque and 327 horsepower to 376 ft/lbs of torque and 390 horsepower, for a gain since the last step of 23ft/lbs of torque, and 68hp!
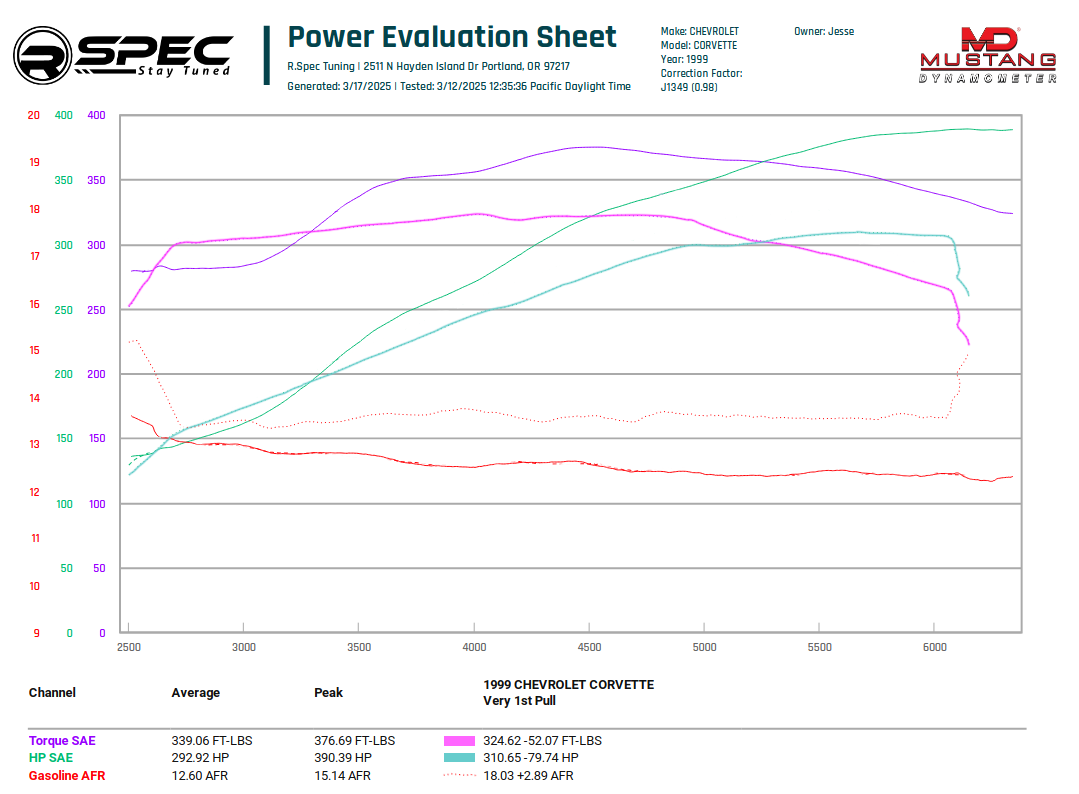
Above is the sheet everyone asks the most about: The original power numbers versus the final state of the car. The original numbers for this setup were 310.65 Horsepower and 324.6 ft/lbs of torque. The final tally of power gains was 79.74 horsepower gained, 52.07 ft/lbs of torque. I don't believe it's relevant to go guestimating here what the difference would be on a Dynojet dyno, as the initial numbers would simply be higher and the gains from there would likely be about the same.
Still, per the graph, there's a significant gain in power from 3250rpm on upwards in both torque and peak horsepower, which is where my track car spends the vast majority of it's life. This will hopefully yield some increased speeds and reduced lap times!
Video of the dyno pull, incase you're interested:
A note and Example on Mustang Dyno vs Dynojet Dynos
So throughout this article I've caveated that I'm using a mustang dyno, and I mention many times they are known to "read low" (there is some debate as to whether they actually read low or Dynojet is just inaccurate, it's not my place to say). Infact, Mustang Dynos generallyn read about 15% low, and here's a solid example:
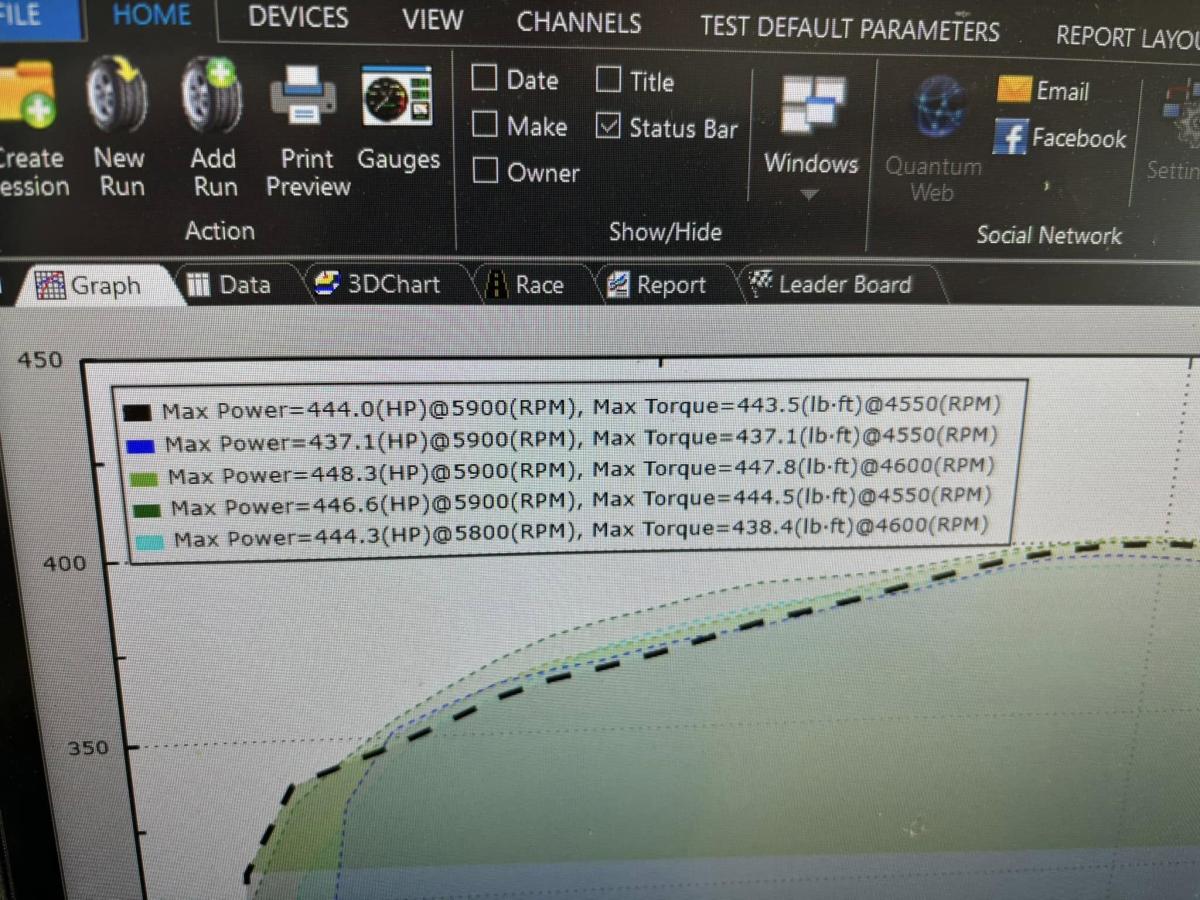
The above Dynojet sheet is from an individual named Eric Moe over in the Corvette Track Enthusiasts facebook group. Eric Moe's setup is very similar to mine. While they have CNC ported 243 heads (so an improvement over mine), they have the lower spec'd Tick SNS stage 2 cam (227/235 .618/.605 110LSA). Eric Moe's car also has similar exhaust but it's only 1-3/4" headers versus my 1-7/8" exhaust. All other engine internals and supporting bits are the same. While the CNC ported heads helps, one would expect that at most it would balance out to the same as the jump to the Stage 3 cam, and even more so there would be lower peak horsewpoer with the smaller header diameter. Per the Dynojet chart above though, you can see their numbers are "much higher" at 448. Where's the difference in power? Well, take my 390, add 15% and... you get 448.5 horsepower on the dot... so the Mustang dyno at least reads 15% lower.
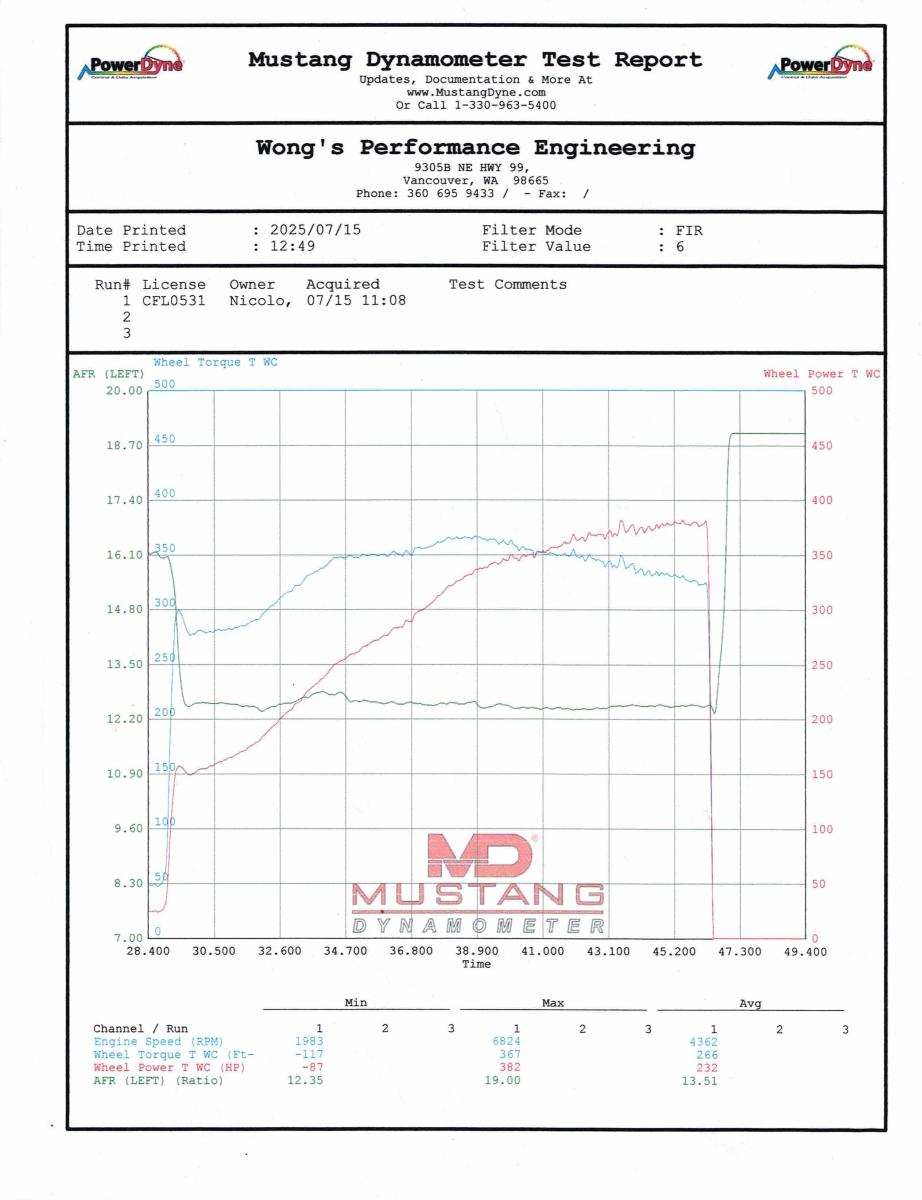
Above is yet another example of the differences in dynos as well. I would later get additional tuning from Wong's Performance as I wanted to improve my idle quality, cold start quality and get rid of pops on deceleration. Well Wong ran his dyno under full load, and uncorrect I'm in theory down 10 hp, but you can see from the pretty clear torque curve, it's all gravy!
Track Testing The Completed Build
The first day on the track was a modest success. The car got out and was doing well.
As noted in the first event writeup, I was able to run a lot of laps right at my previous best lap time, and I wasn't going all out just yet. Not too shabby!
Unfortunately, my next track event at the Ridge would get cut short...
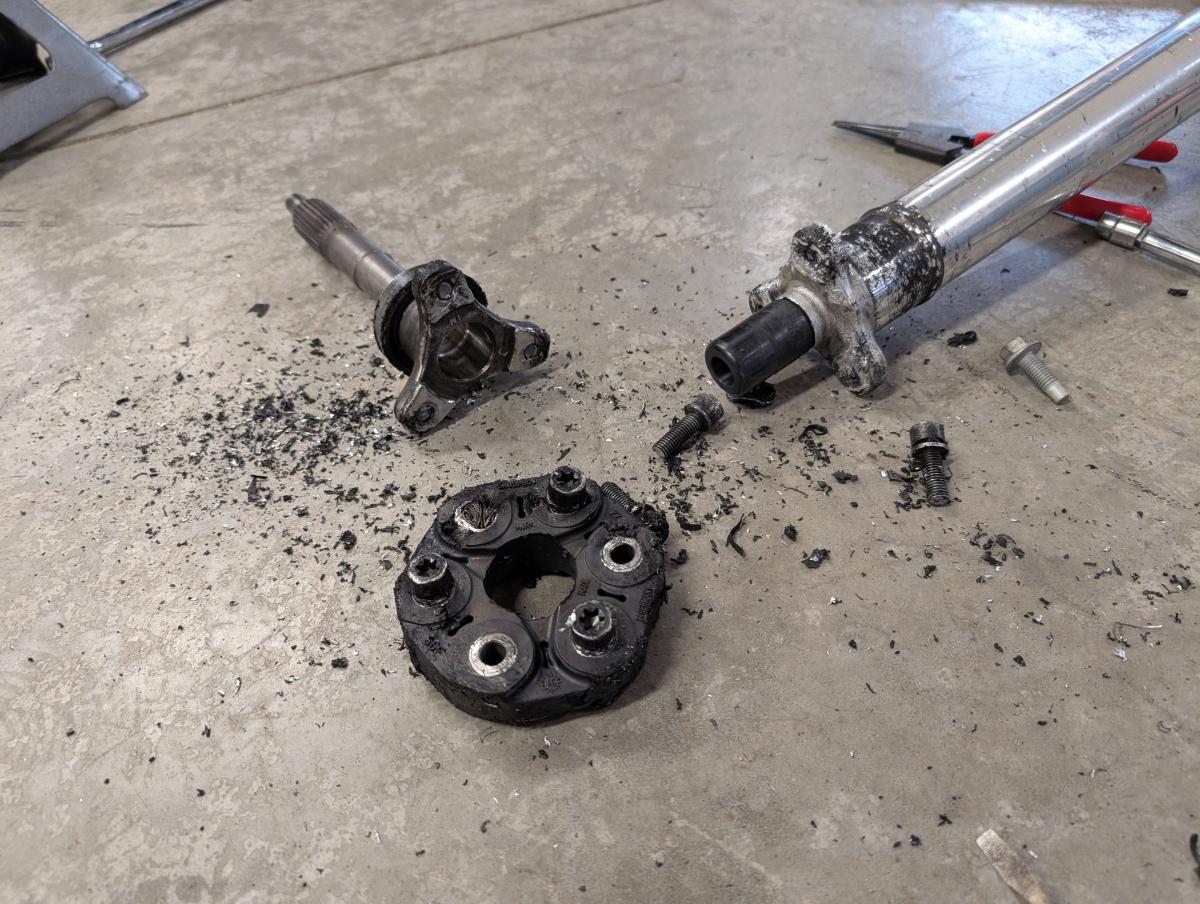
As you can see... I completly sheered the bolts on my torque tube. I wrote a big article about torque tubes over on c5corvettes but the short version goes I kept a 10mm bolt based torque tube thinking I'd get away with it since I am not producing that much power or am boosted. Welp... turns out I am indeed now producing that much power as the bolts entirely sheered off! DOH!
My next two events were at PIR, and finally I was able to start putting the details together come the second event with a bit of extra tuning changes to make sure we took advantage of the extra airflow I could get at speed. At the second event I was able to outdo my previous personal best, so not too bad! I didn't compare top speeds though... so hard to say just how much the extra power was helping.
The best example I think of the power helping would have to be my experience at ORP for my next track day event. I was able to not just drop my lap time and set a PB, but I dropped my best lap time by 1.5 seconds, on a track that doesn't really reward outright power all that much.
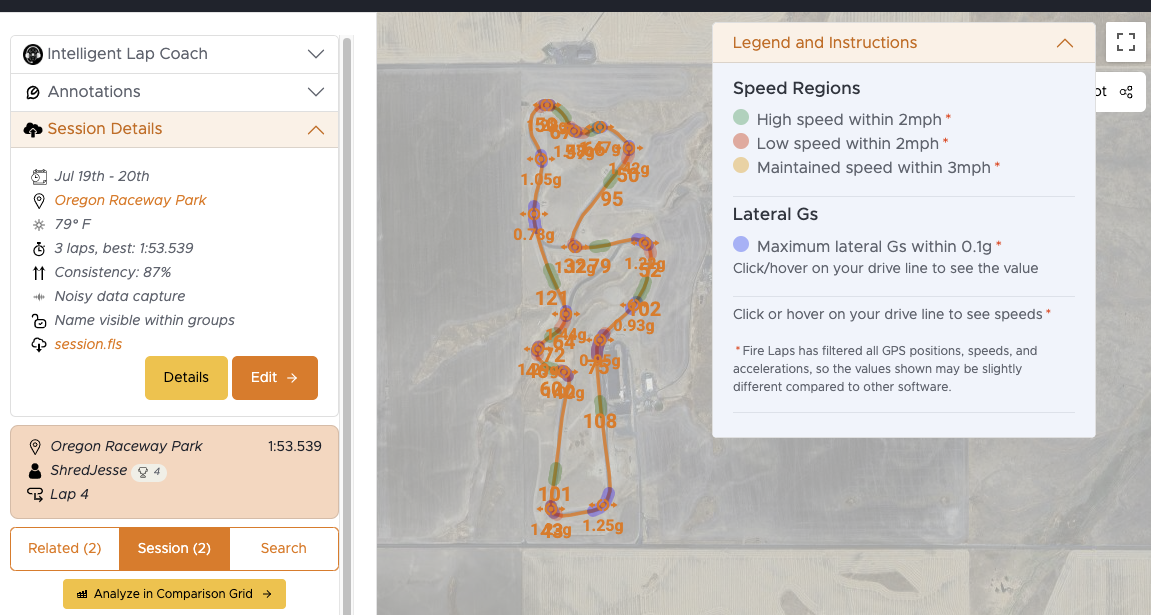
Above you can see some of my top speeds at ORP for my 46th event, with 108mph being my highest on the front straight, and 121mp down Valkyre hill being my second highest top speed.
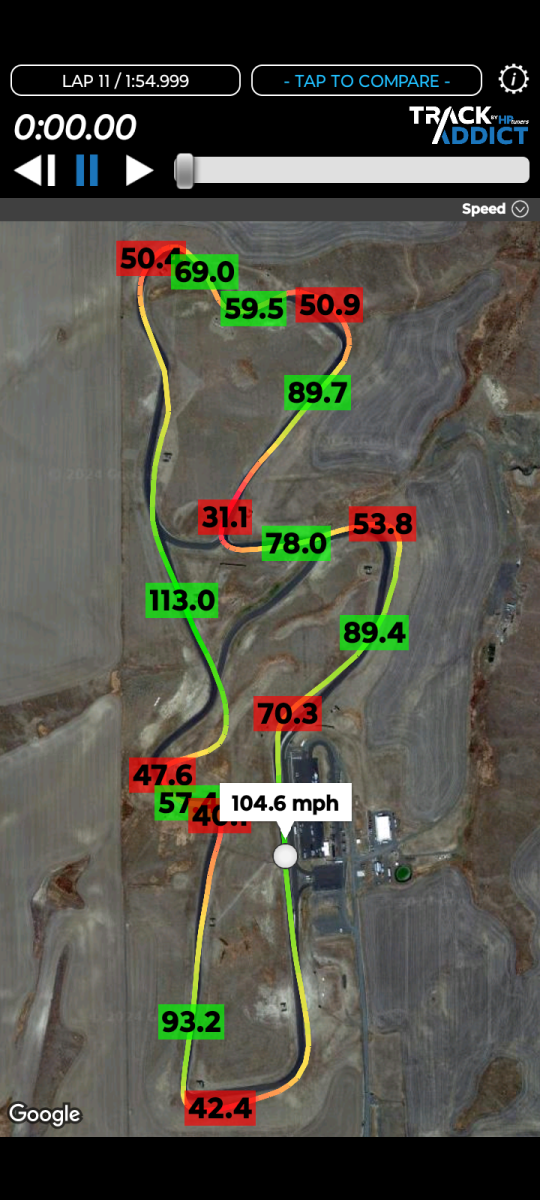
Here you can see my previous best top speeds, with 113mph downhill being the highest, and 104.6 on the front straight. That's an improvement of 8mph on the back straight, and 4mph on the front straight.
Now some of the improvements in times can be attributed to the Vitour P1 tires. They're undeniably fast, though they can be a bit vague at time and tend to break traction without much announcement. Still, the major increase in top speeds can be largely attributed to addtional power.
So there you have it... the car produces more power and puts down better times!
Would I do Anything Different Next time?
I'll be updating this section with an indepth writreup and some pictures, but yes.
Going with such an aggresive cam has made getting my cars cold start and idling characteristics very difficult. You'd think, "who cares, it's a track car that never idles"... but then you gotta load and unload the car and drive around the pits or do some street testing in your neighborhood, and you realize just how much you give up. A less aggressive cam would still yield notably gains without being so unbearable at low speeds.