C5 Corvette Interior Weight Loss
The weight loss on the C5 Corvette inside was so significant and full of so many pictures I decided to break it off from the parent article about overall c5 weight reduction. That article was already starting to get pretty significant in length, and the sheer amount of pictures I have here are pretty significant! Plus I weighed in a lot of items most folks won't care about, but their actual weigh in can end a few internet arguments on just how much weight a C5 Corvette can ditch!
The guiding principle behind my weight reduction up front was two-fold. Stay within the SCCA Max 2 class restrictions for my car, along with get as much done without extreme aggrevation or cost. Essentially, I'd call this "stage 1" if you cared bout doing similar. You can get more from here, but cost and effort starts to go up notably while the reward for that effort is not all that significant. This generally covers most of the big ticket items short of the dash itself, which does weight 19lbs but good luck fitting in a street car esque class having ditched that! ... although you can remove it if you do a full cage but then you're just putting that weight right back in there and then some!
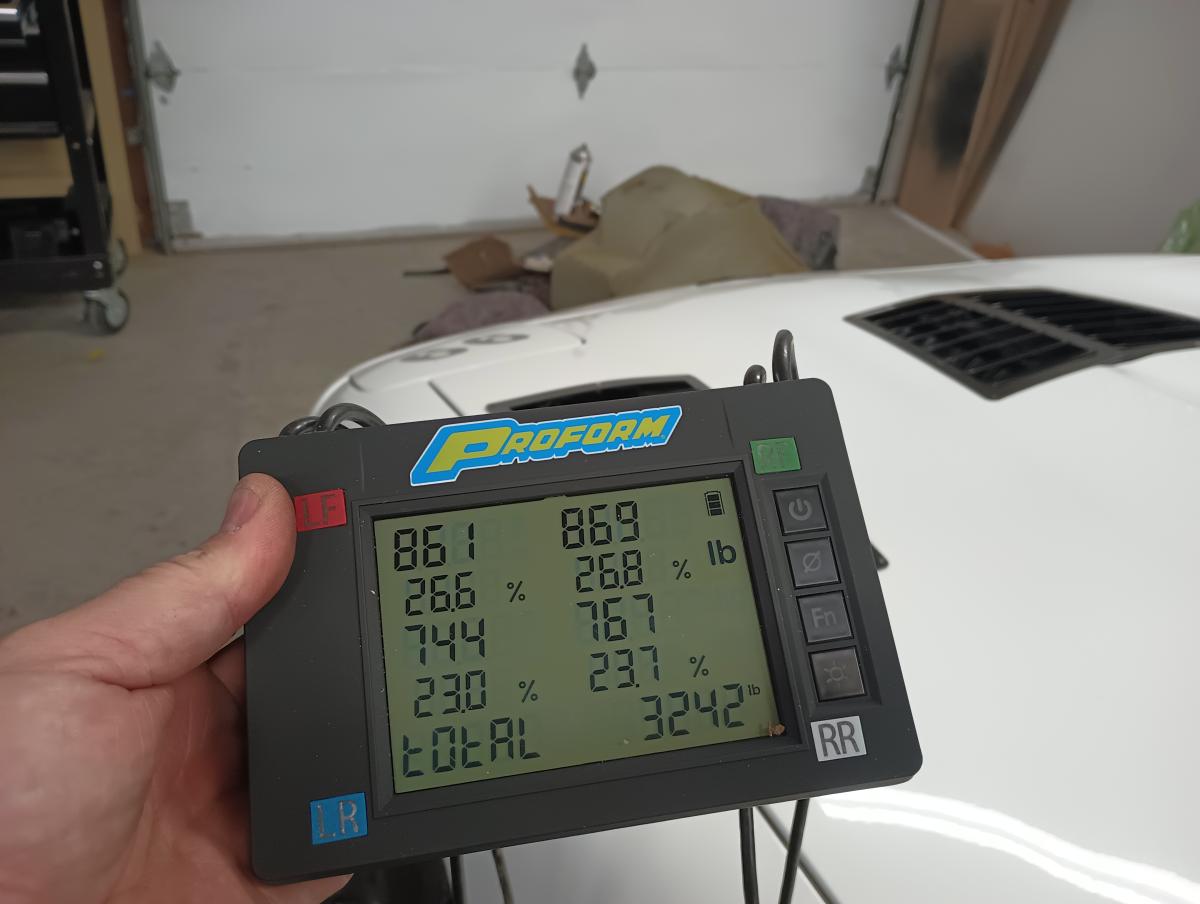
Incase you didn't read the parent artice on the subject, prior to stripping the interior for unused weight the car weighed in at 3242lbs. I'd like to see this car as sub 3000, but... I think I'm going to just wind up at sub 3100lbs if I play my cards right!
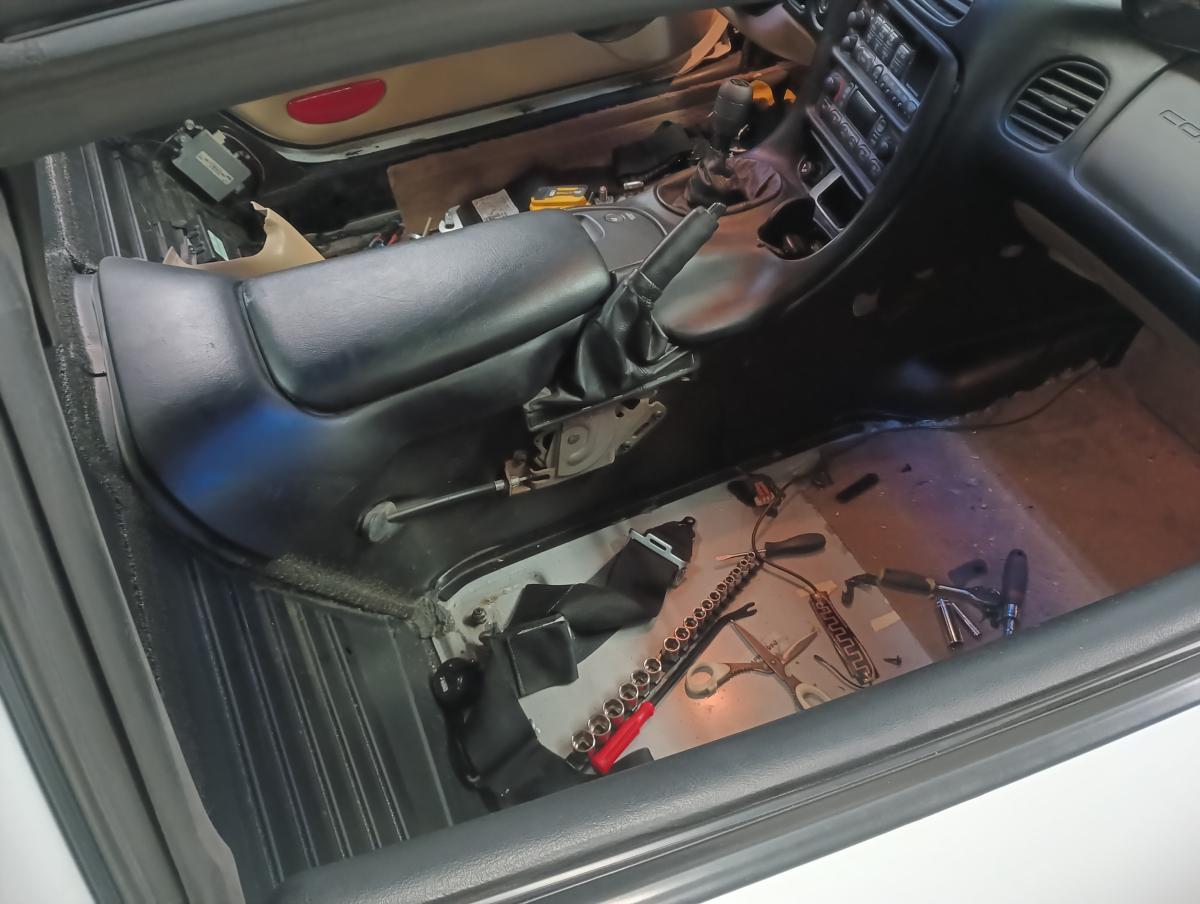
I started simple with the weight reduction work on the interior of the car. Per SCCA Max rules, with a roll bar (which I have) you can remove all of the carpet behind the seats. So, I removed all of the carpet up to the leading edge of the seats and removed carpet along the trans tunnel since it's all tied in with the carpet behind the seats as well. This yielded a modest weight savings that I didn't bother to weigh by itself.
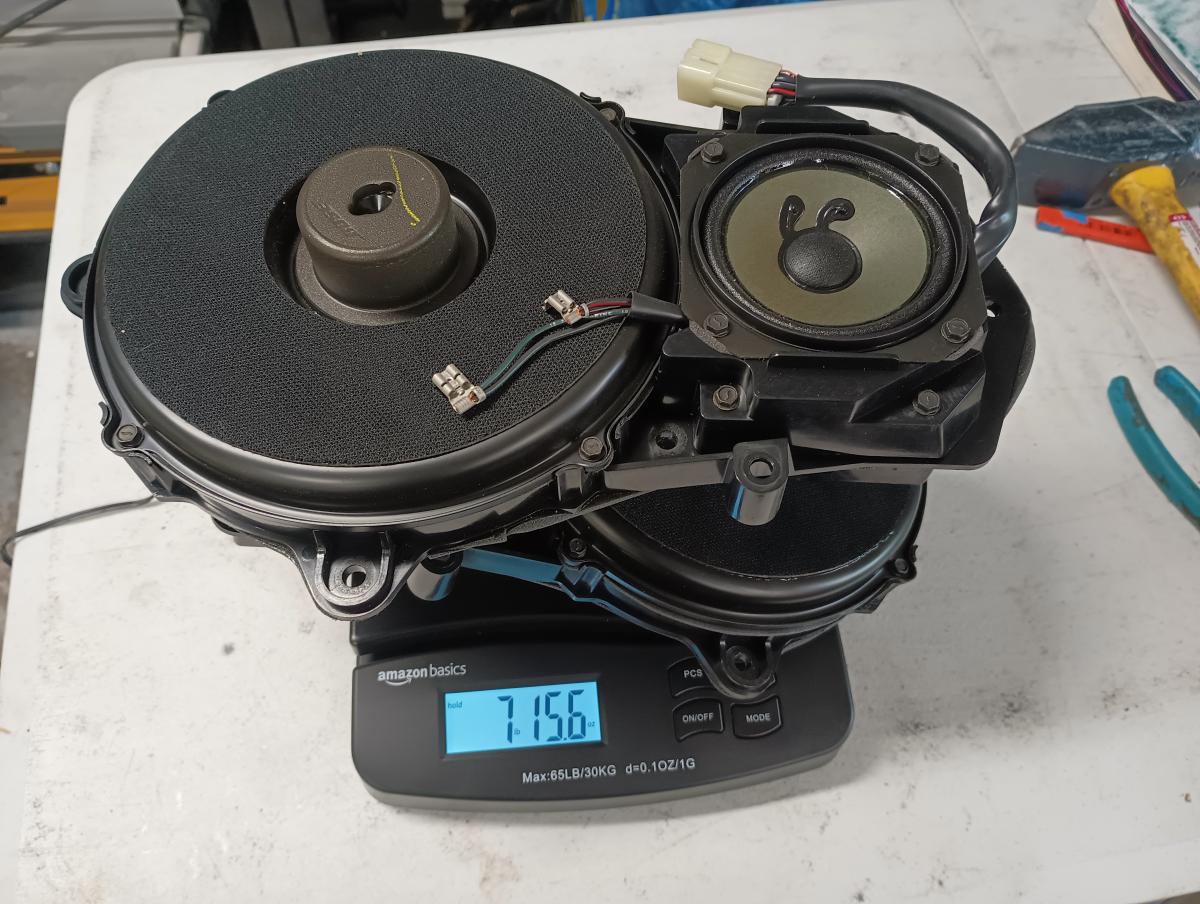
Next up I removed the speakers from the doors. They indeed had a bit of extra heft over the rear speakers, so their weight loss was notable at 8lbs! Note to others doing this though, watch for how weak the plastic is on the window controls. On my passenger side door they all but crumbled when trying to get them out of the door.
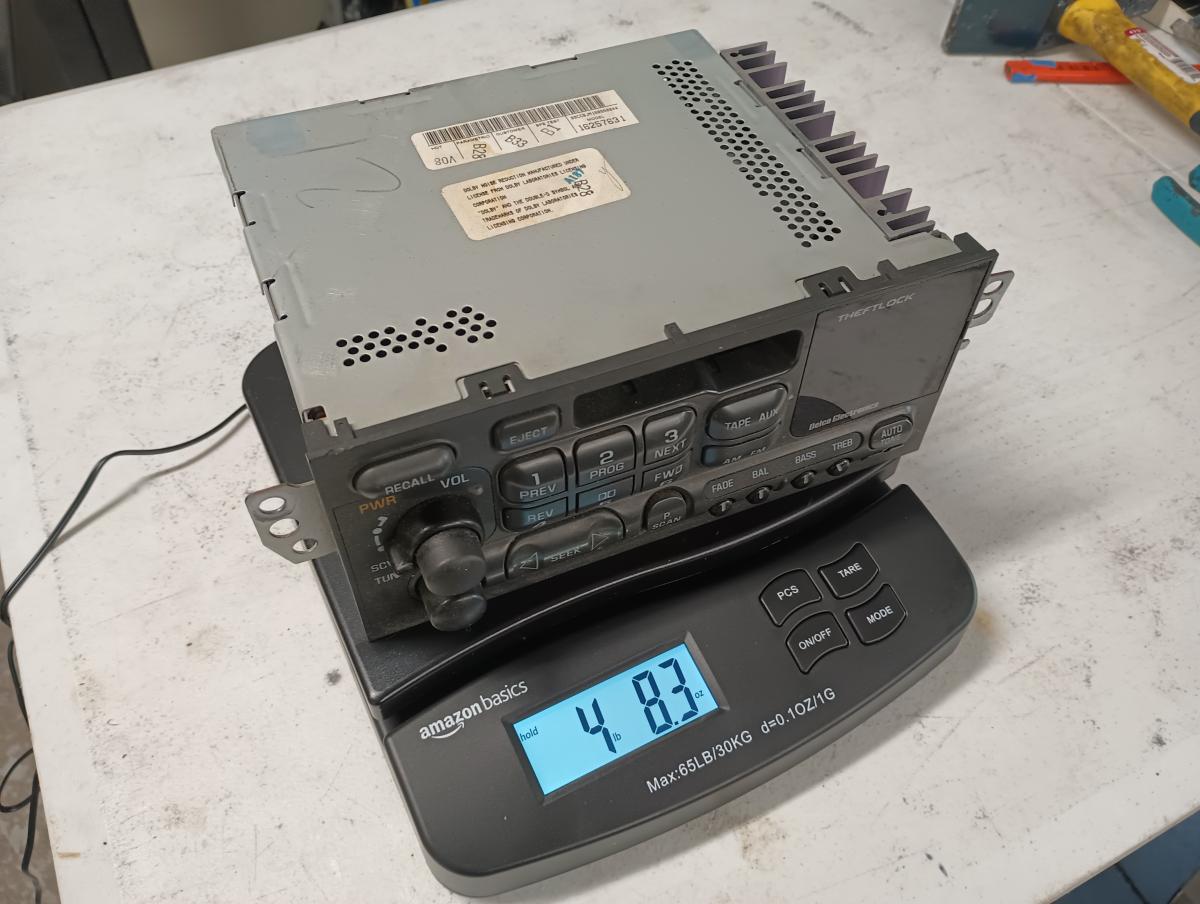
With the speakers removed, I started pulling apart the center console both to save weight and to work my way to the passenger airbag. Along the way, I removed the tape deck stereo, which weighed 4.5lbs. That was some easy additional weight loss. Biggest bummer for me here though is I have now lost my excuse of "Well of course your car is faster, mine is so old it has a tapedeck in it!" Gone is the tapedeck crutch, along with a place to pull all of my collected cassette tapes.
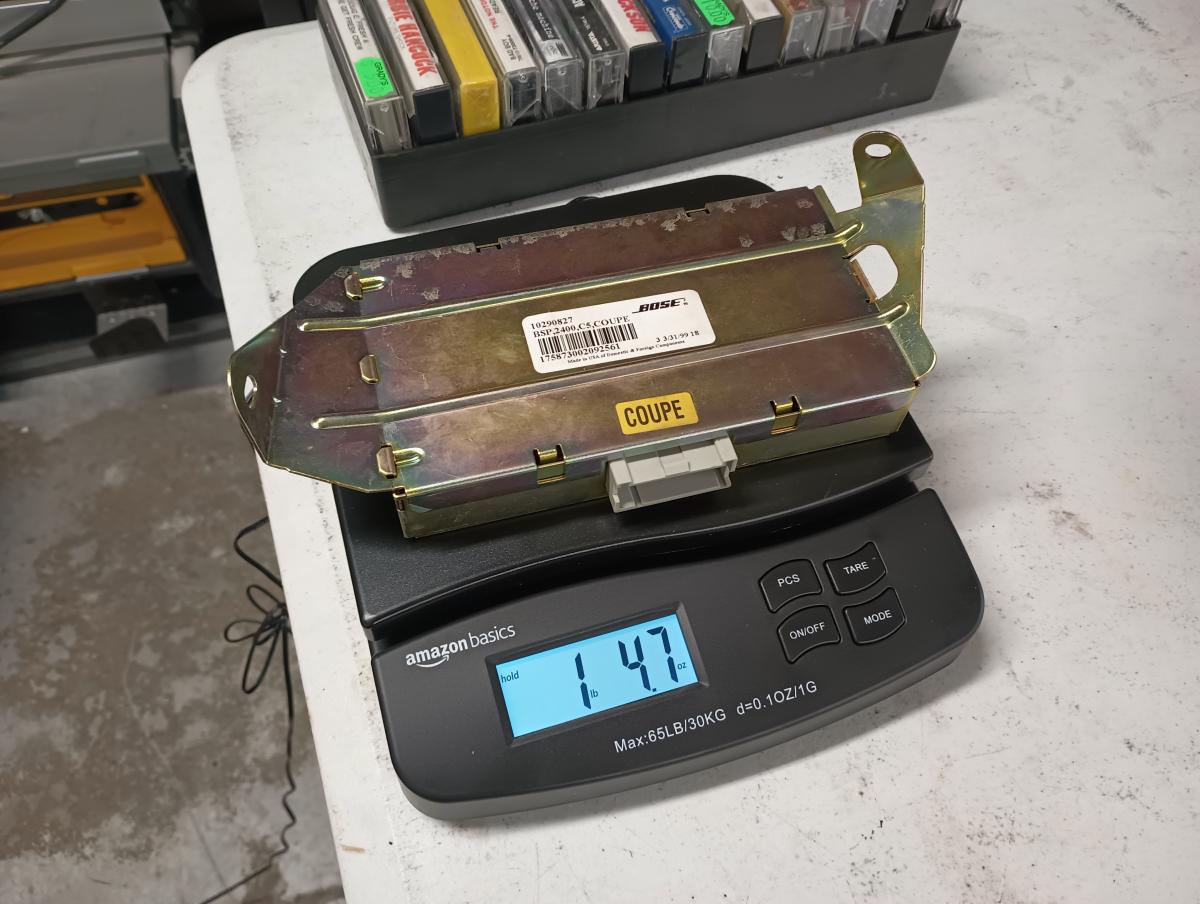
One item I was hoping would yield more weight loss was the Bose stereo amplifier up front. The amplifier weighed a in at 1.25lbs, so not an insignificant item to throw away, but hardly noteworthy in itself.
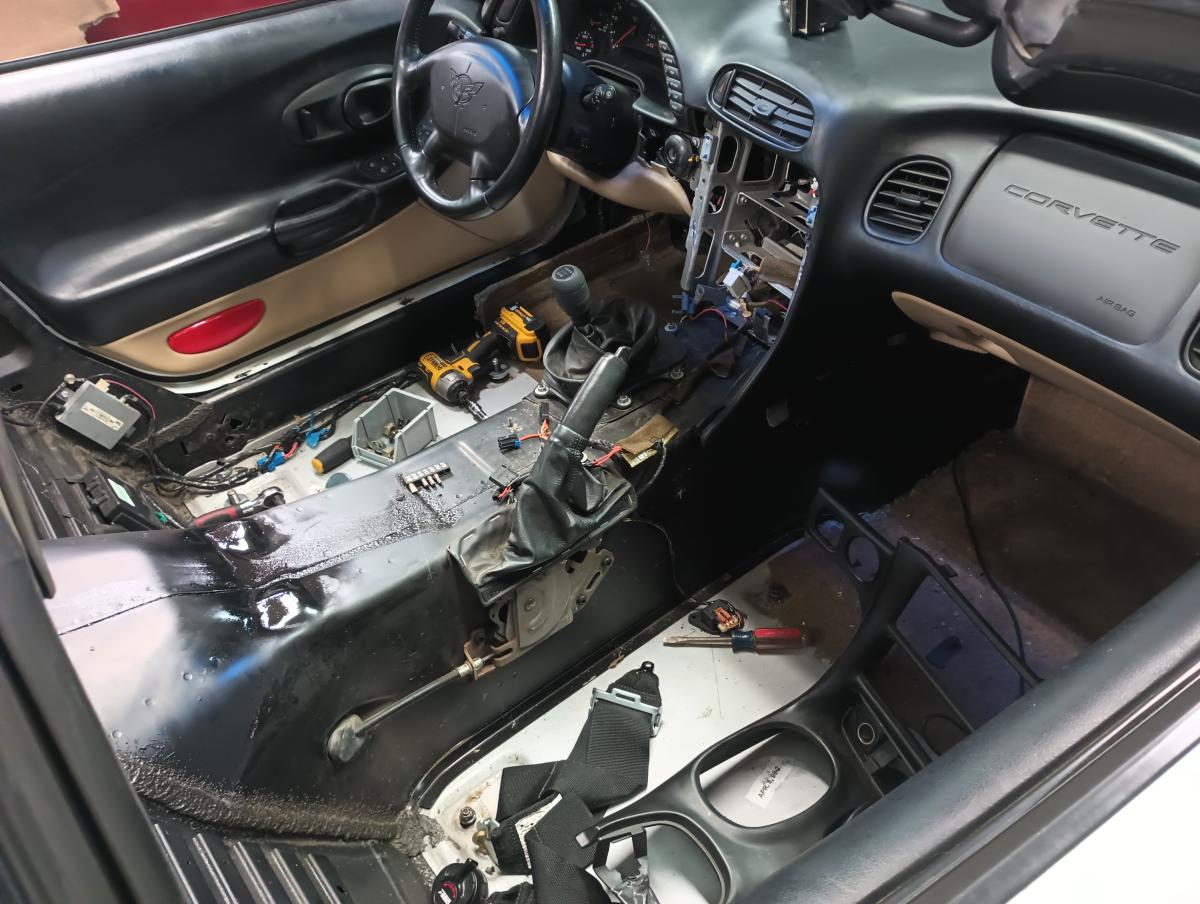
At this point, I'd removed much of the easy to get to stuff. Next up, I had to tackle two difficult tasks. Pulling the steering wheel and pulling the dash.
I used this video for pulling the glovebox:
...and I used this video for removing the dash
Overall the dash panel removal wasn't all that bad. Be most careful along the way for how brittle a lot of these older GM plastics have become, but in general it all came apart pretty reasonable.
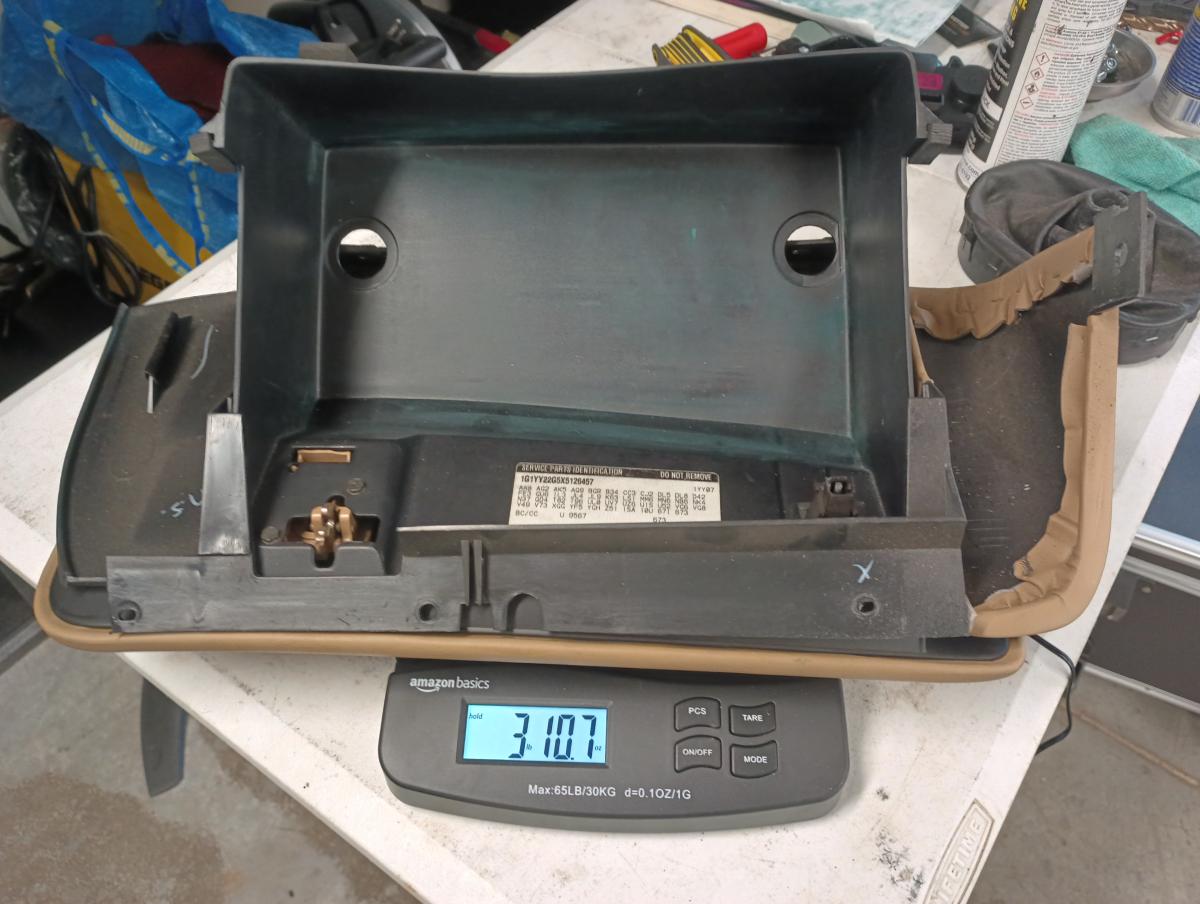
So one thing that wasn't specific in my SCCA Max class, was removal of some interior items. There was just the guiding principle behind all of it. Since the glovebox really isn't an essential piece of street going kit... I decided to remove it! This yielded a 3.75lb weight savings.
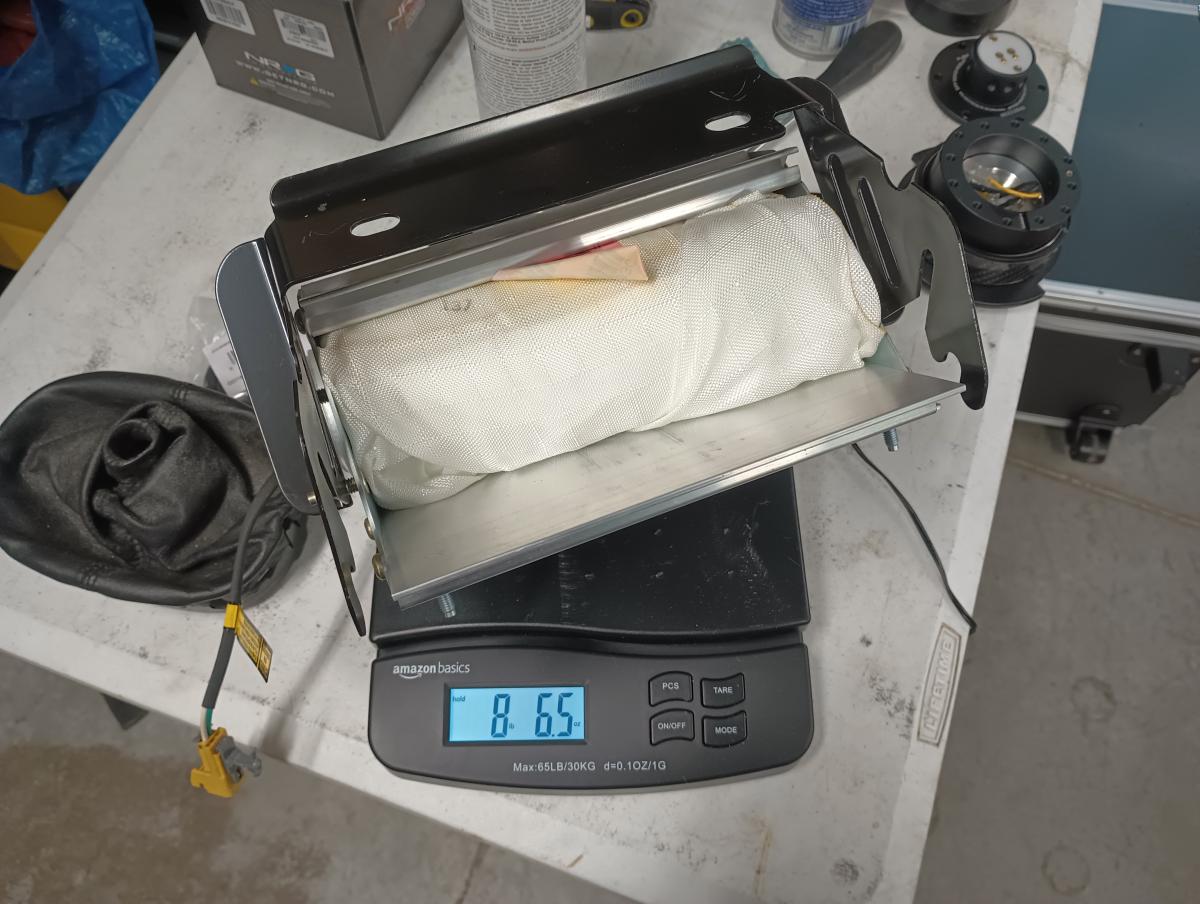
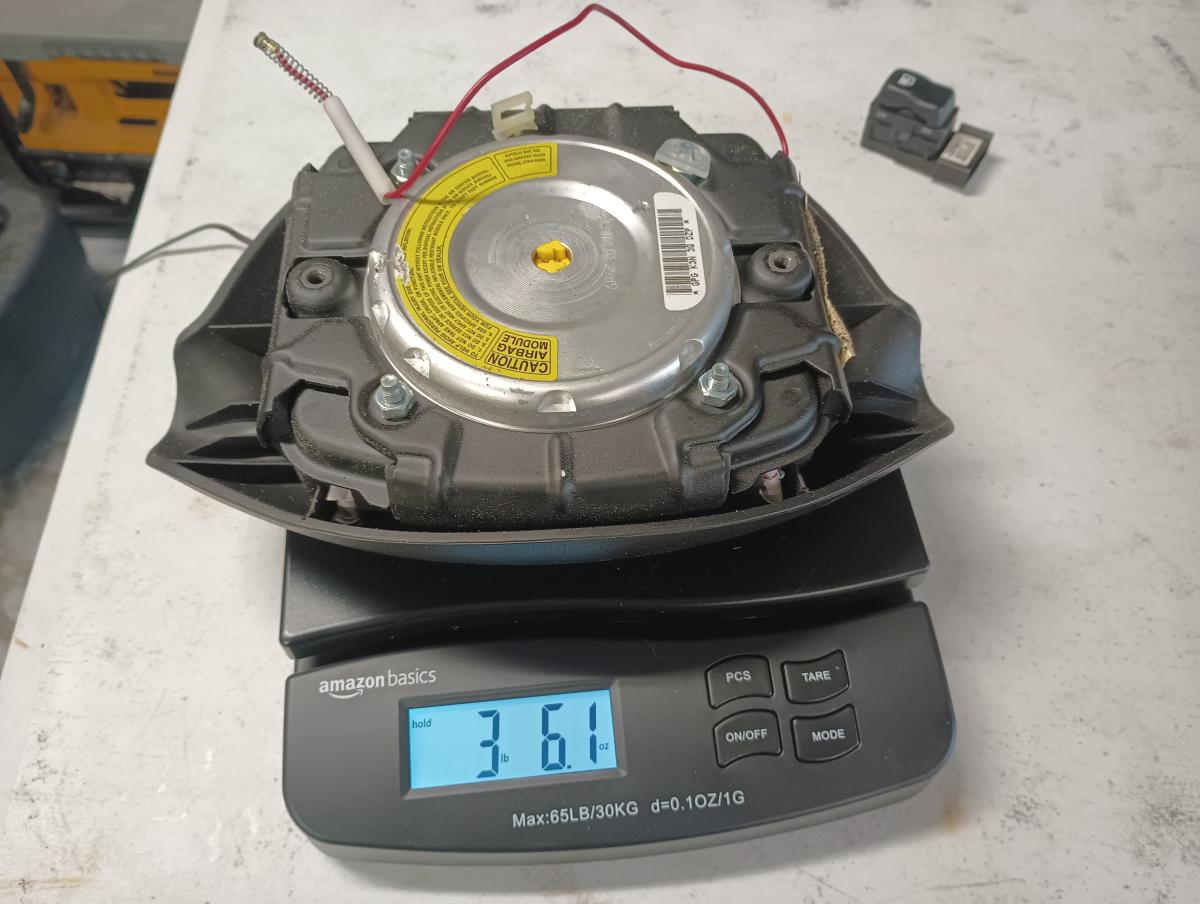
The passenger airbag weighed in at a chunk 8.5lbs! It weighed more but I removed the face plate for reinstallation into the dash!
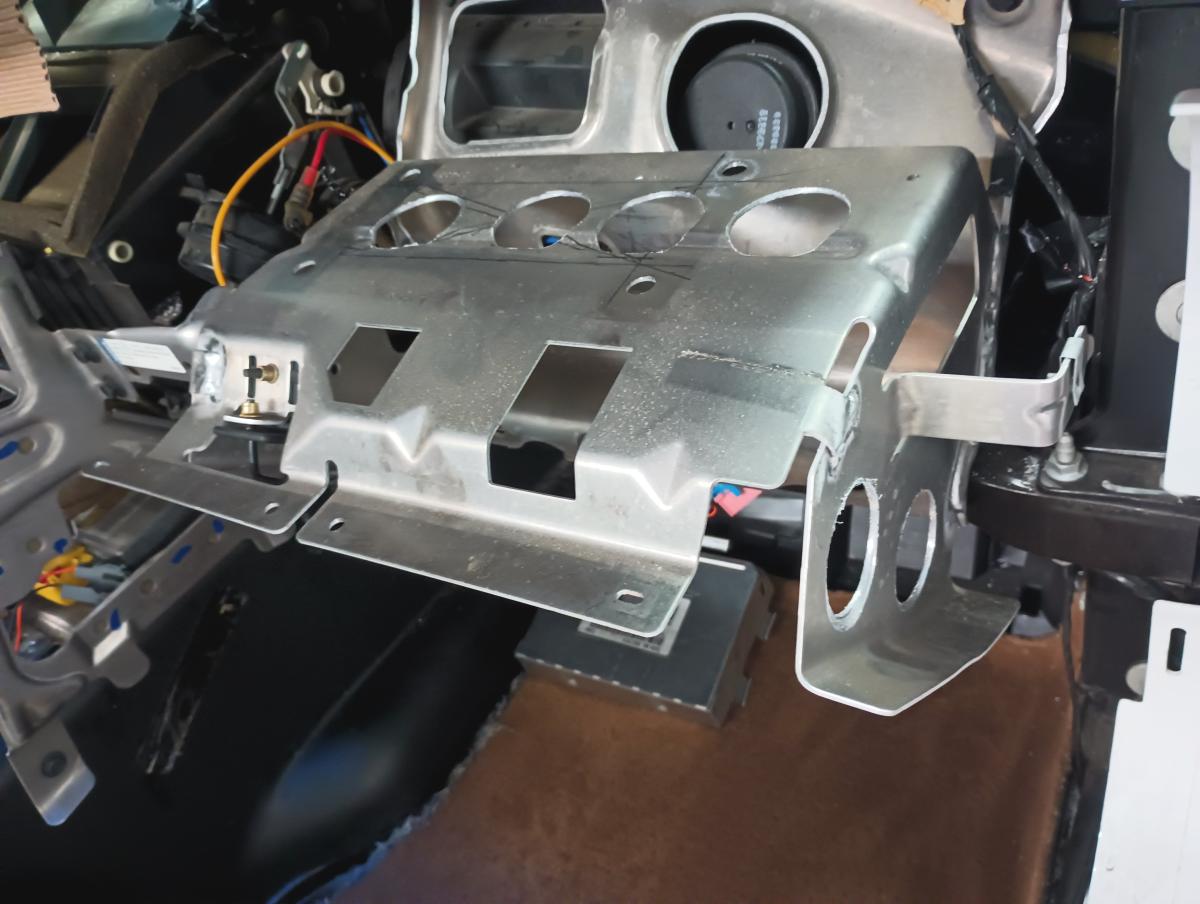
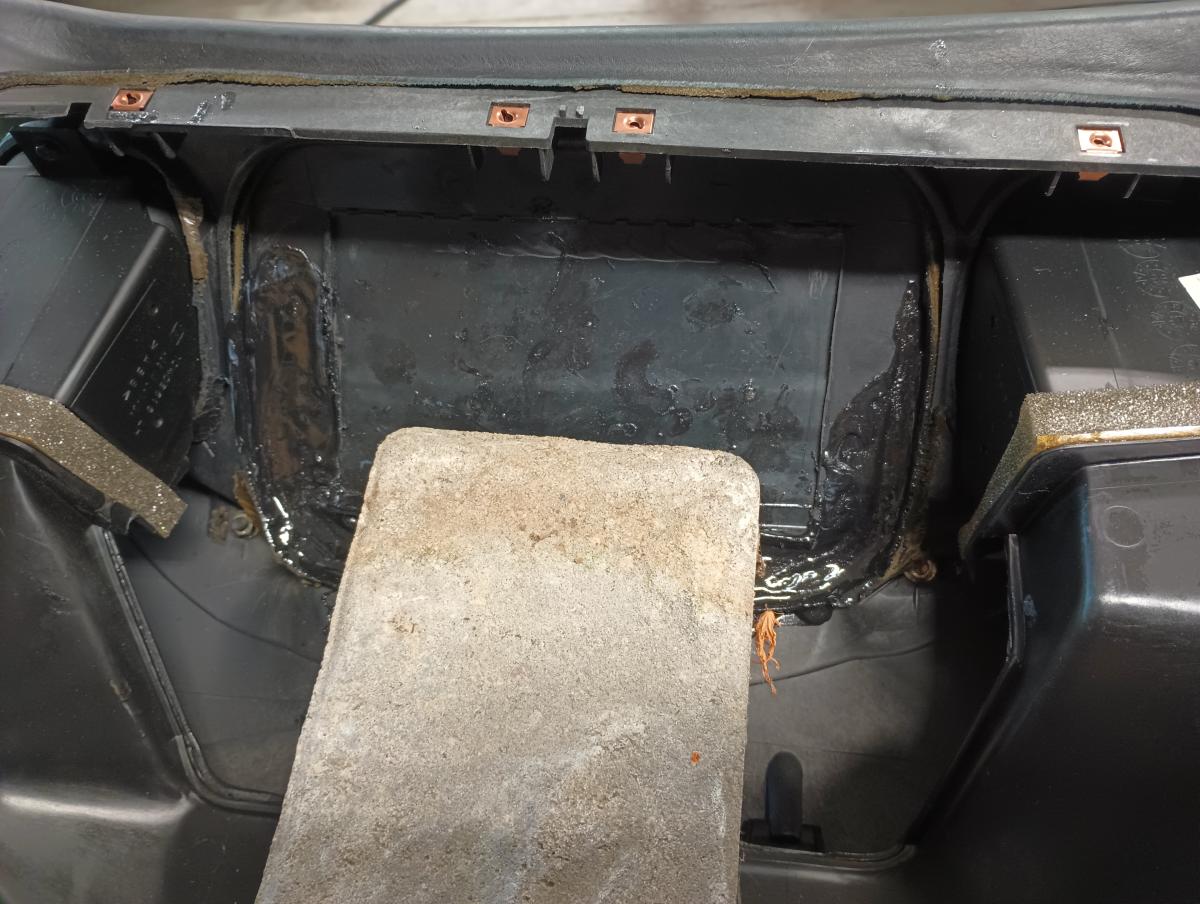
Now the frame/assembly under the passenger side airbag is pretty significant in size, but is made of lightweight aluminum. I determined you couldn't reasonably remove it as so much of the dash attachs to it... but I could cut holes in it to save weight! So every circle you see on there (6 of them) cut in for fun to see if I'd get some weight savings.
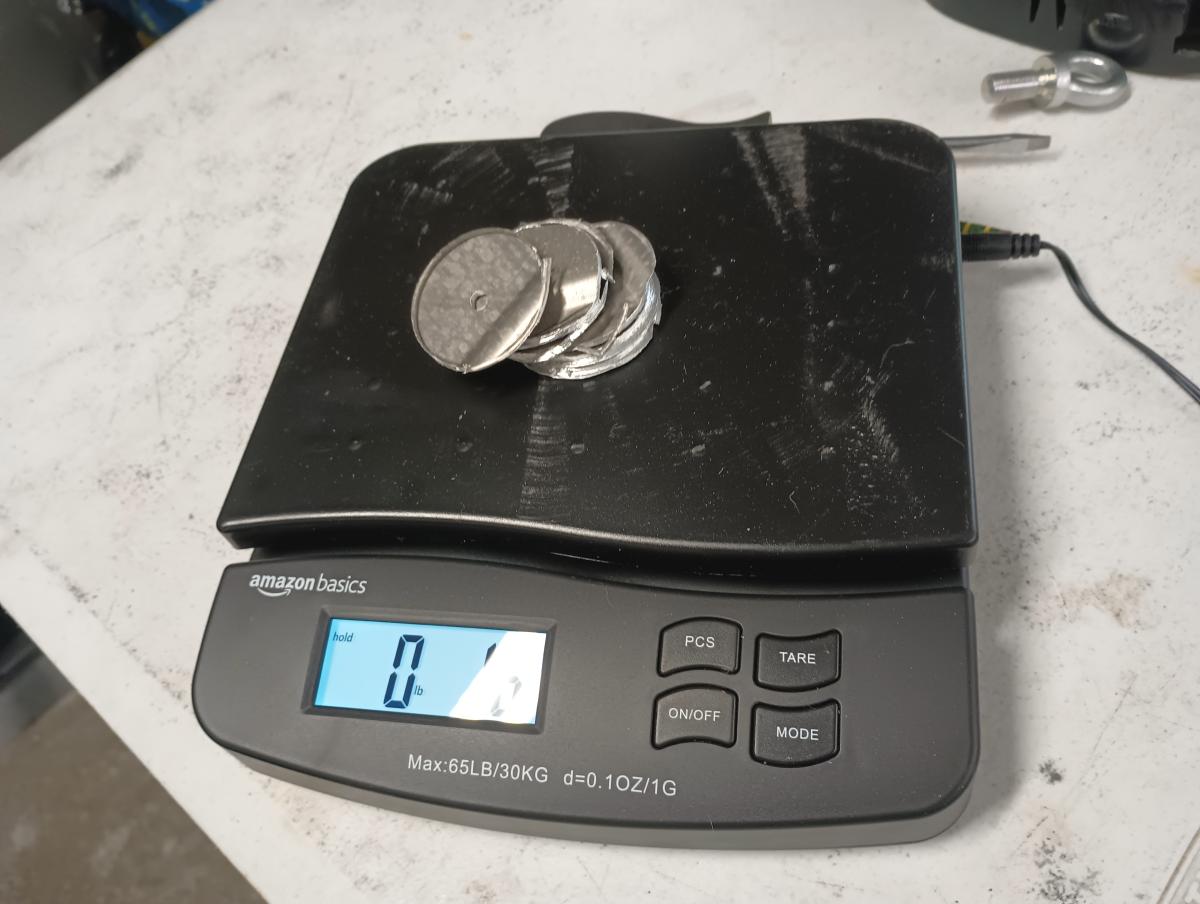
Unfortunately there was glare whhen I weighed in the circles I cut out, but they yielded about a 1.6 oz weight savings. So... not worth it for the effort really.
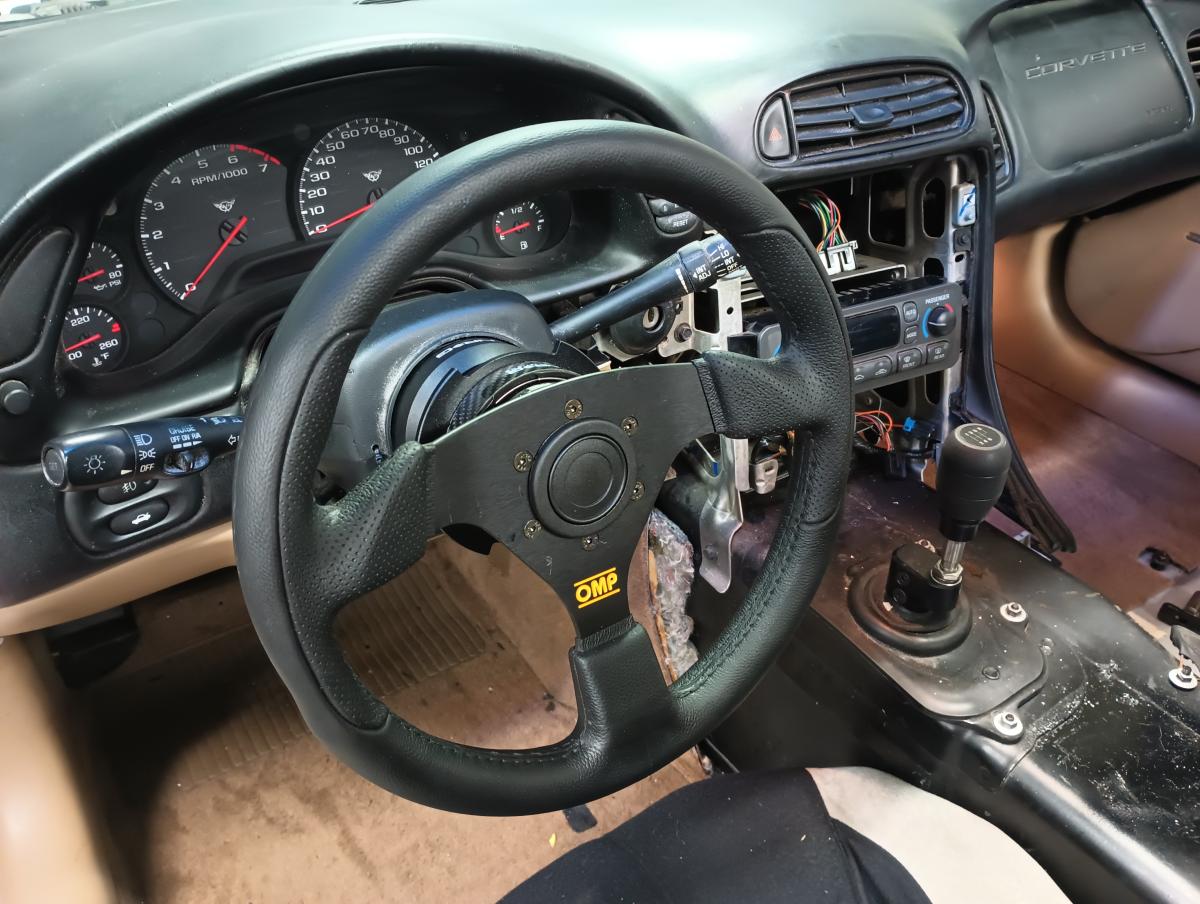
At this point, I transitioned to changing out the OEM steering wheel. There was a wide variety of reasoning behind this change, most specifically being I needed to do so for safety in order to be able to egress the car in the evnet of an emergency better. With a removable steering wheel I can chuck it aside and have plenty of spacer for myself to move about. Plus there were likely some weight savings to be had in ditching the airbag.
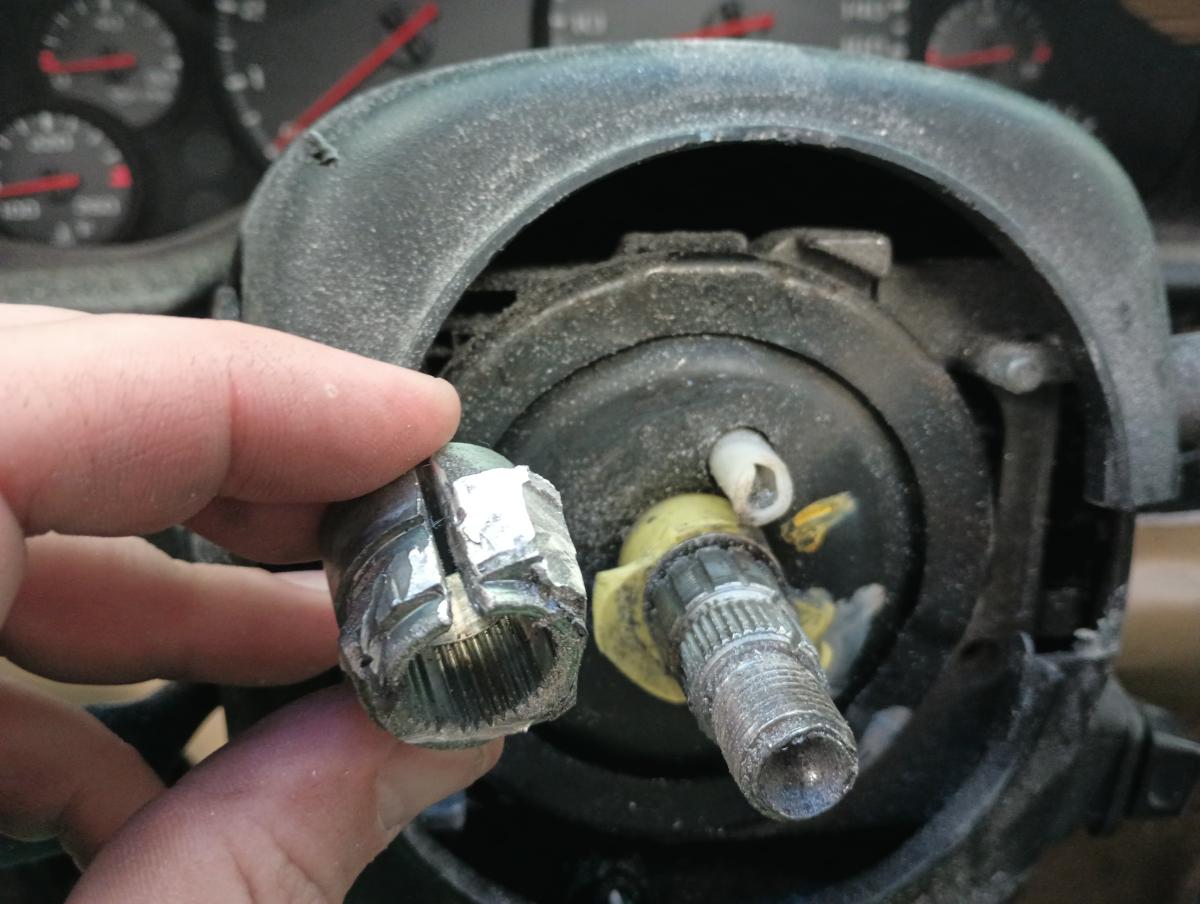
I don't think I have anything to add to the overall information out there on removing the steering wheel... I'll just say I was one of the unlucky few who got an impossibly difficult to remove steering wheel. Both myself and my friend Dave attempted to muscle the steering wheel off to no avail, and neither of us are small dudes by any account. From there, we both tried a variety of tools and hammers to no avail. The damn thing wouldn't budget. So, what I did was use a cut off wheel to slow cut the steering wheel down to just the bit that went onto the OEM spindle, and cut that parallel to the splines on the OEM spindle. Now, it's worth noting that fine aluminum shavings can be flamable... and if you happen to be sitting in the car covered in aluminum shavings and hit the steel part of this assembly the ensuing sparks can ignite the metal shavings on you on fire. I'm fine and got away with just a jump and a startle but... you've been warned!
So as I had to cut the steering wheel out I couldn't weigh it and the airbag to compare it to the new steering wheel and adapter. If I had to guess, it's probably a wash. The OEM steering wheel was pretty light despite it's massive diameter, and the airbag itself was only 3.5 or so lbs. Given I added a new quick release hub, 1/2" spacer, and mounting adapter... I doubt the weight savings really existed here.
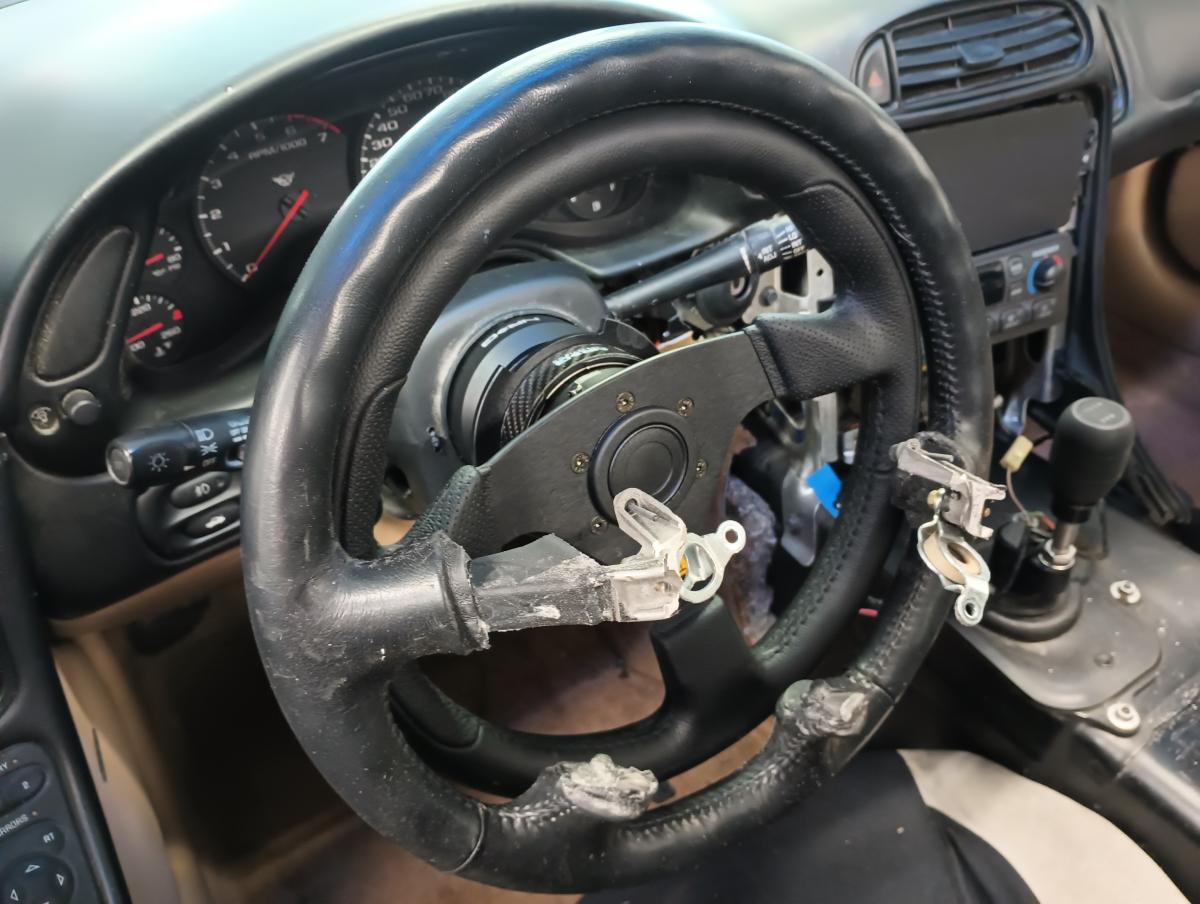
Here you can see the OEM steering wheel put around the new replacement 330mm steering wheel. The diameter is reduced significantly, and with the quick release hub I can get out of the car easier. My car also has factory telescoping functionality that I was able to retain by keeping the box from under the drivers seat, so I've got that adjustability now as well!
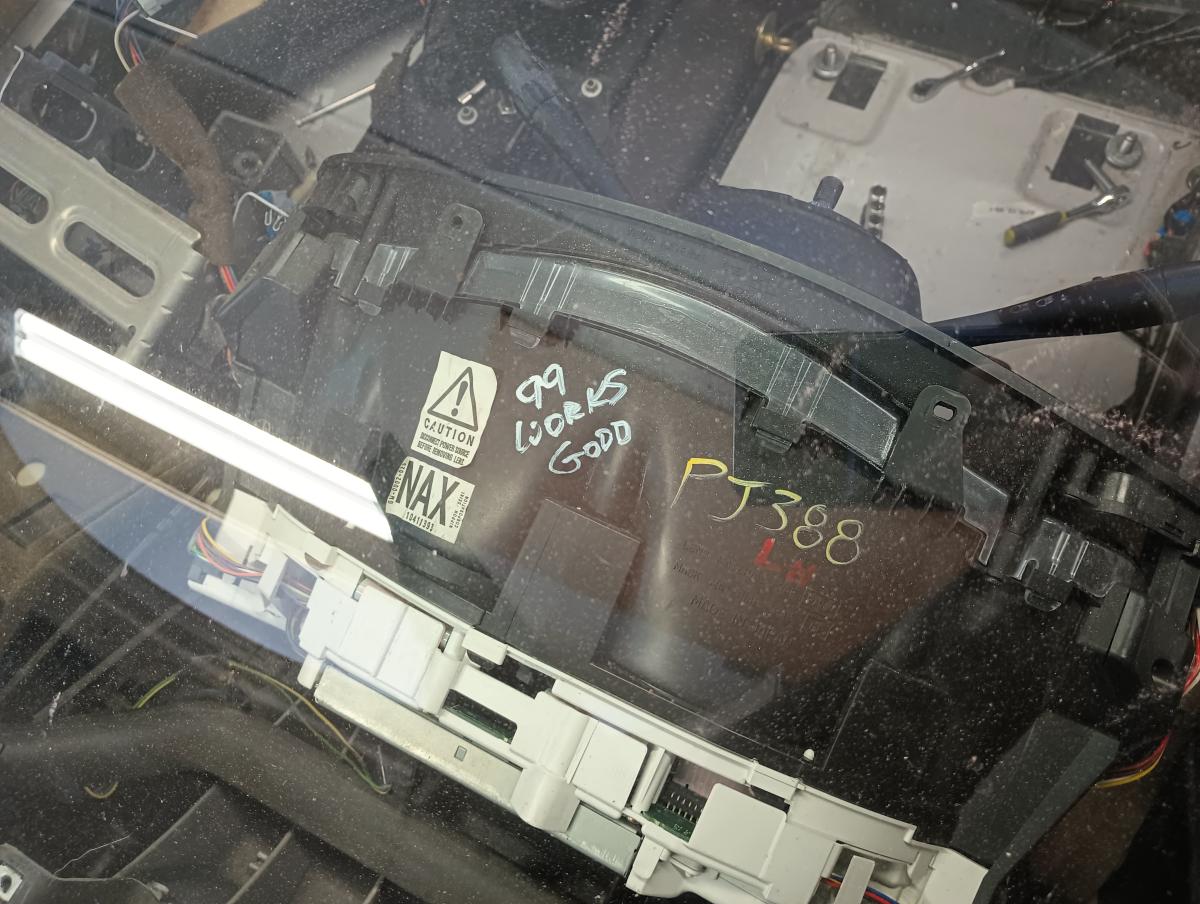
While the dashboard was removed we got a good view of the gauge cluster... and hey would you look at that it says "99 looks good". So to me, and my friend Dave, this sure looks like I got a replacement gauge cluster for some reason. So who knows what the actual mileage on this is. The good news is, most of these corvettes are so under stressed from what their capable of that it didn't matter, the car has gone through 30 track days admirably!
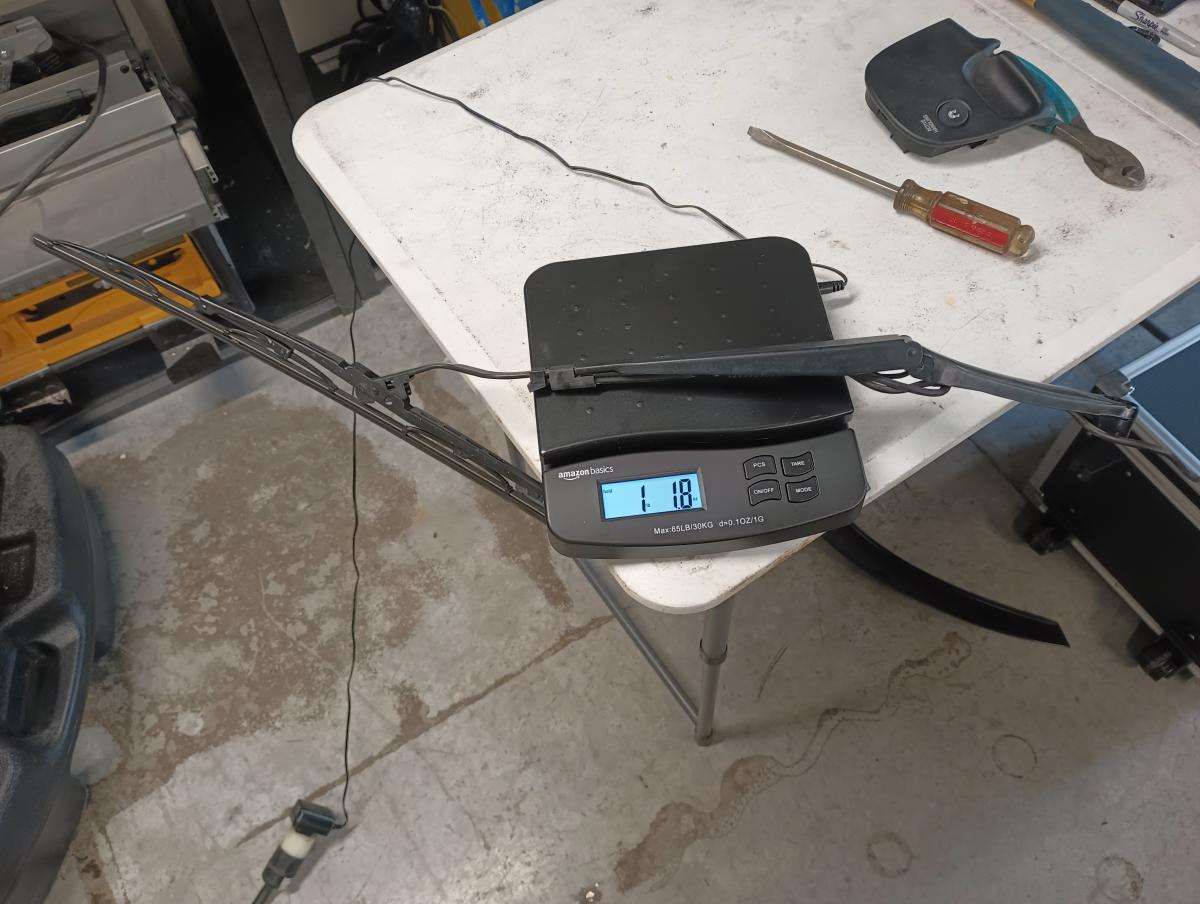
On a whim I decided to remove the passenger side wiper from the car. The SCCA Max rules weren't terriby clear on if I could do this, so I decided to shoot the middle and just remove one side. Now if I get a few sprinkles I can make my way back to the pits! The weight savings were pretty much just 1lb, but eh it adds up.
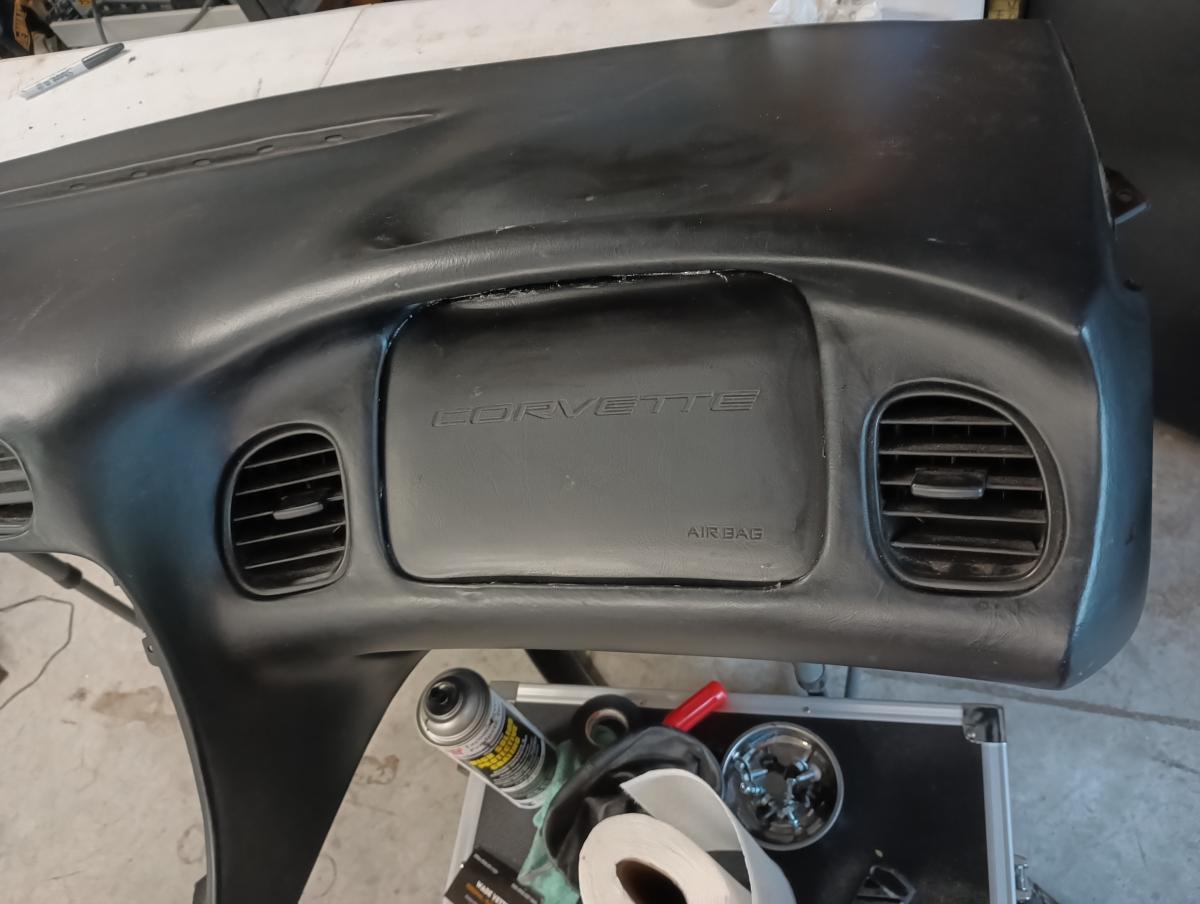
Now I couldn't really stick to the SCCA Max Ethos of this not being a stripped out race car if ther were giant holes in my dash... so I cut the faceplate off the passenger airbag and plastic epoxied it back into place.
Holding the piece in place wasn't easy... but my wise girlfriend brought me a brick and that made the process easy enough!
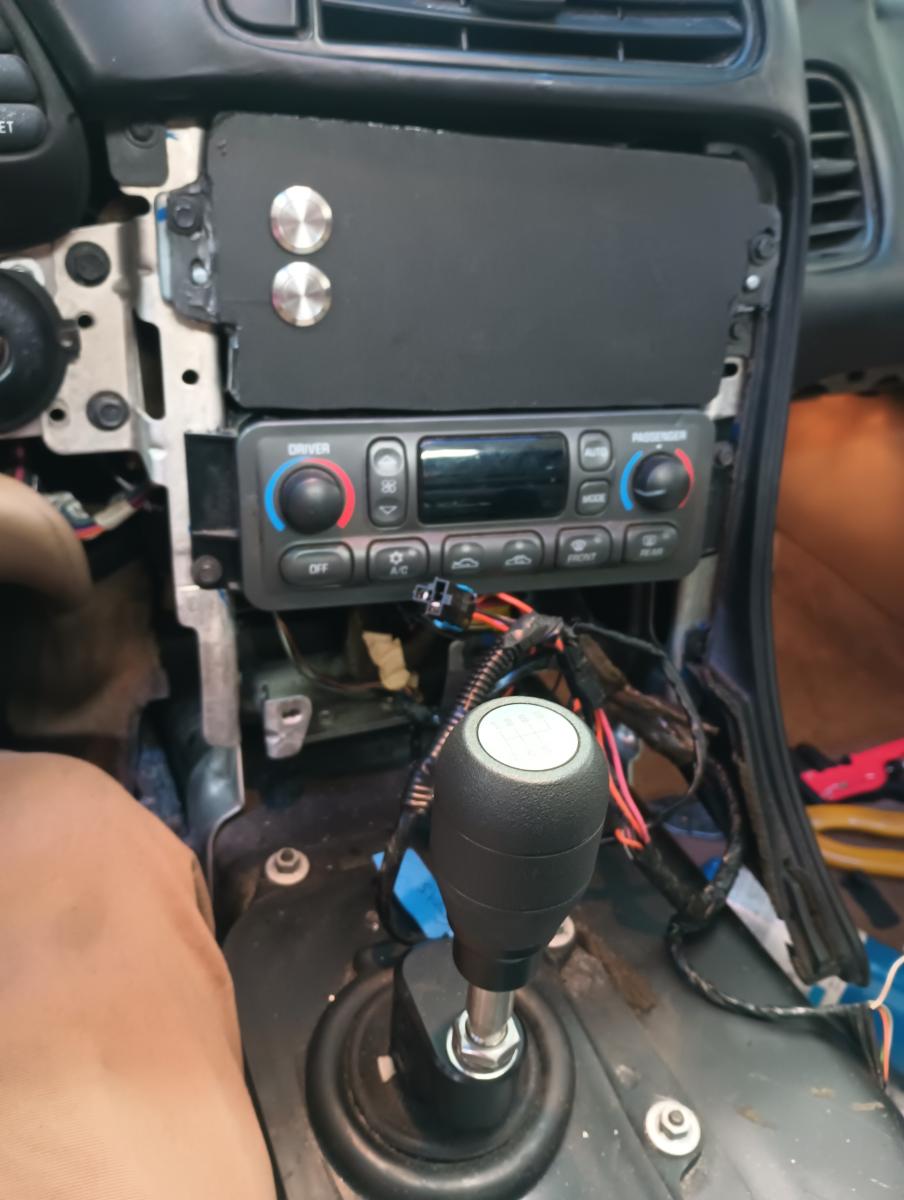
Now you might be wondering just waht you can do with that big gaping hole where your stereo used to be or what to do with the switches you removed like for disabling traction control or opening your gas cap. What I did was put in a thick piece of plastic I had lieing around and wire in two momentary switches. Turns out, you can pretty easily wire the OEM switches to the new switches.
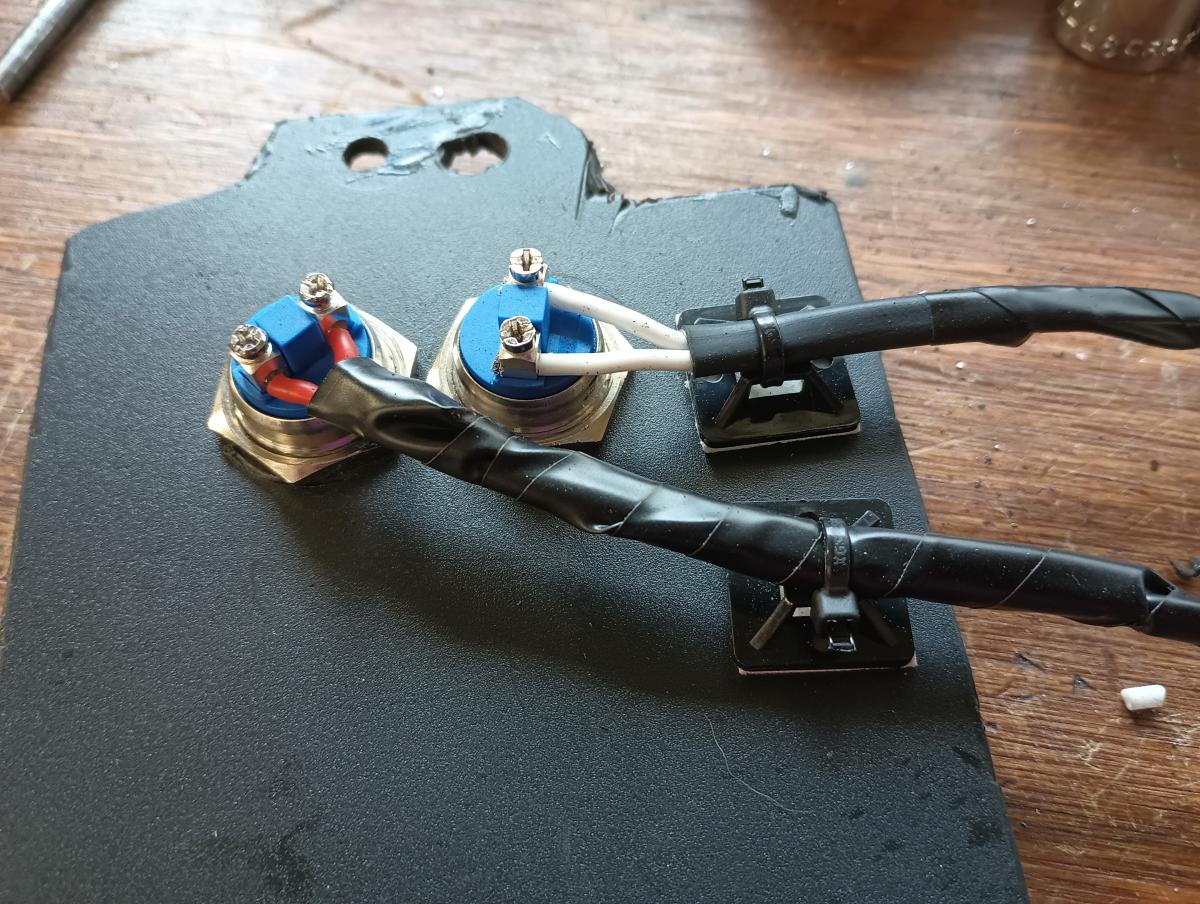
I used these momentary switches from Amazon. Nothing special, just when you push the button a connection is made between the two wires leading into the switch. For the gas switch, there are only two wires so this is pretty easy to wire up. For traction control though, things are a little more confusing. There are six wires accross it. I used the following notes form a post at CorvetteForum.
Connector pins - <10 9 8 7 6 5>
pin 5 - BLK Ground
pin 6 - Brn/wht Traction Control Switch Input
pin 7 - Pnk/Blk Ground
pin 8 - Tan/Wht Electronic Traction Suspension Control switch input
pin 9 - Brn/Wht Console Lamp Dimming Output
pin 10 ORN Battery Positive Feed
Now I'm sure you'll notice I highlighted pin 5 and 6. Those are the two you need to wire into your momentary switch. Be aware that there are two brown/white wires. You want the one next to the black wire that is on the end. If you grab the one near Orange, it's not the right one and I can't guarantee what it will do.

One other bit of useful information is that I ran connectors to the OEM wires and wires with connectors to my switches. This let them access the OEM wiring harness without having to fish too much wire around, and I was also able to add strain relief as you see pictured above. Strain relief is important, as otherwise when the wires bounce around the strain is on the connectors. That's how connections come loose and fail.
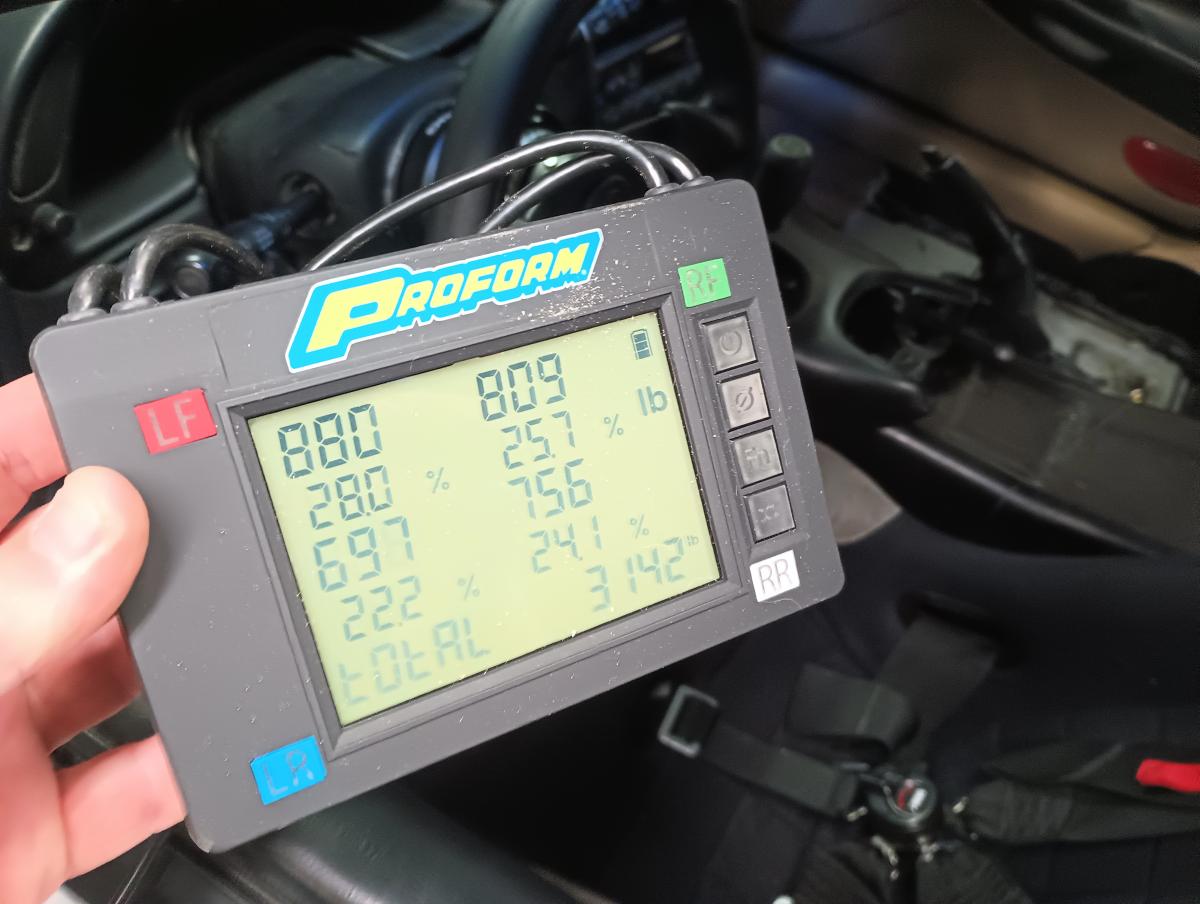
...and here is the moment you've been waiting for... what was the final total weight loss of all this work! Welp, with the passenger seat removed (which your class may allow, SCCA Max does not) the car weighed in at 3142lbs. That means I was able to save almost exactly 100lbs of weight on the car! Not too shabby!
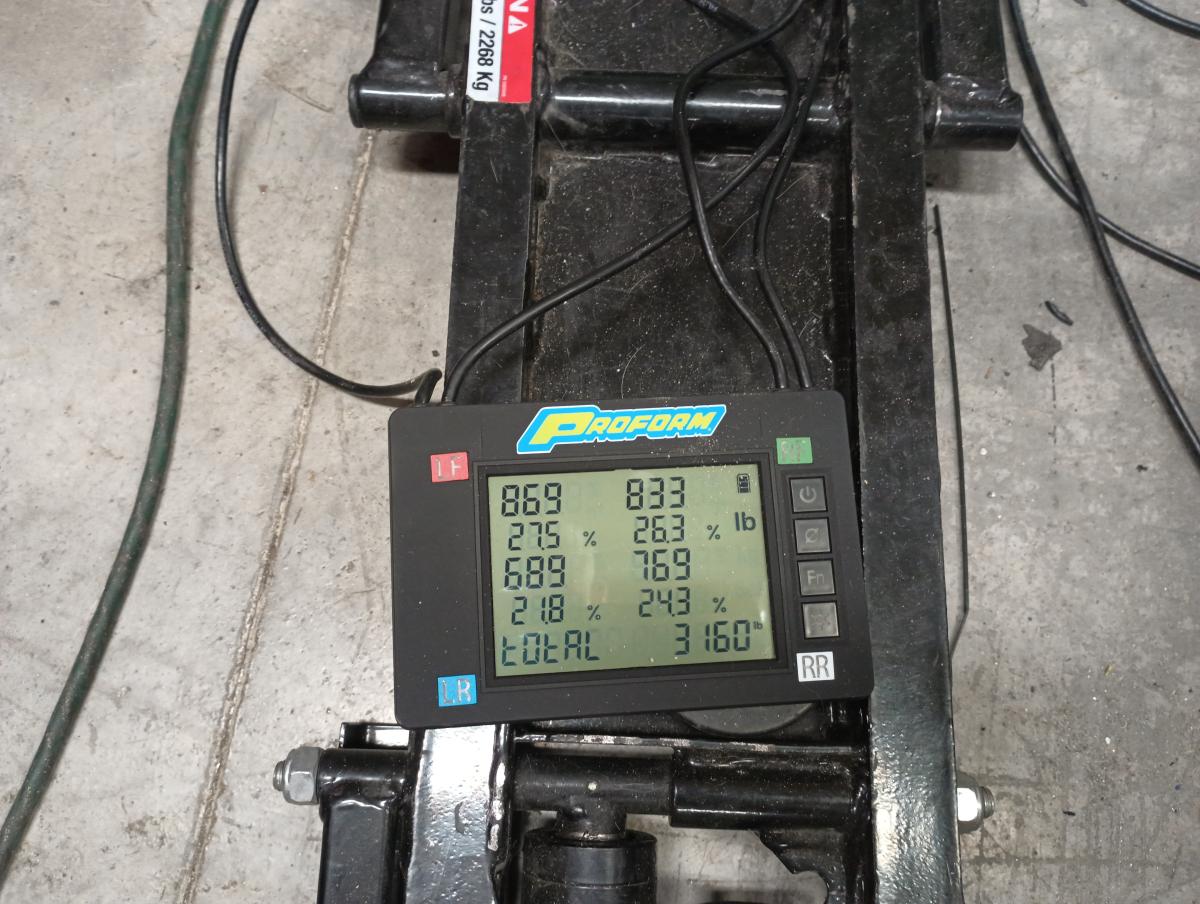
With the passenger seat and harnesses put back in the car, the car weighed an additional 18lbs. Not too shabby, but I do think I could save some weight and increase safety by swapping this seat out to a bucket seat. What I'll probably do long term is upgrade the drivers seat and swap the current seat over to the passenger seat.
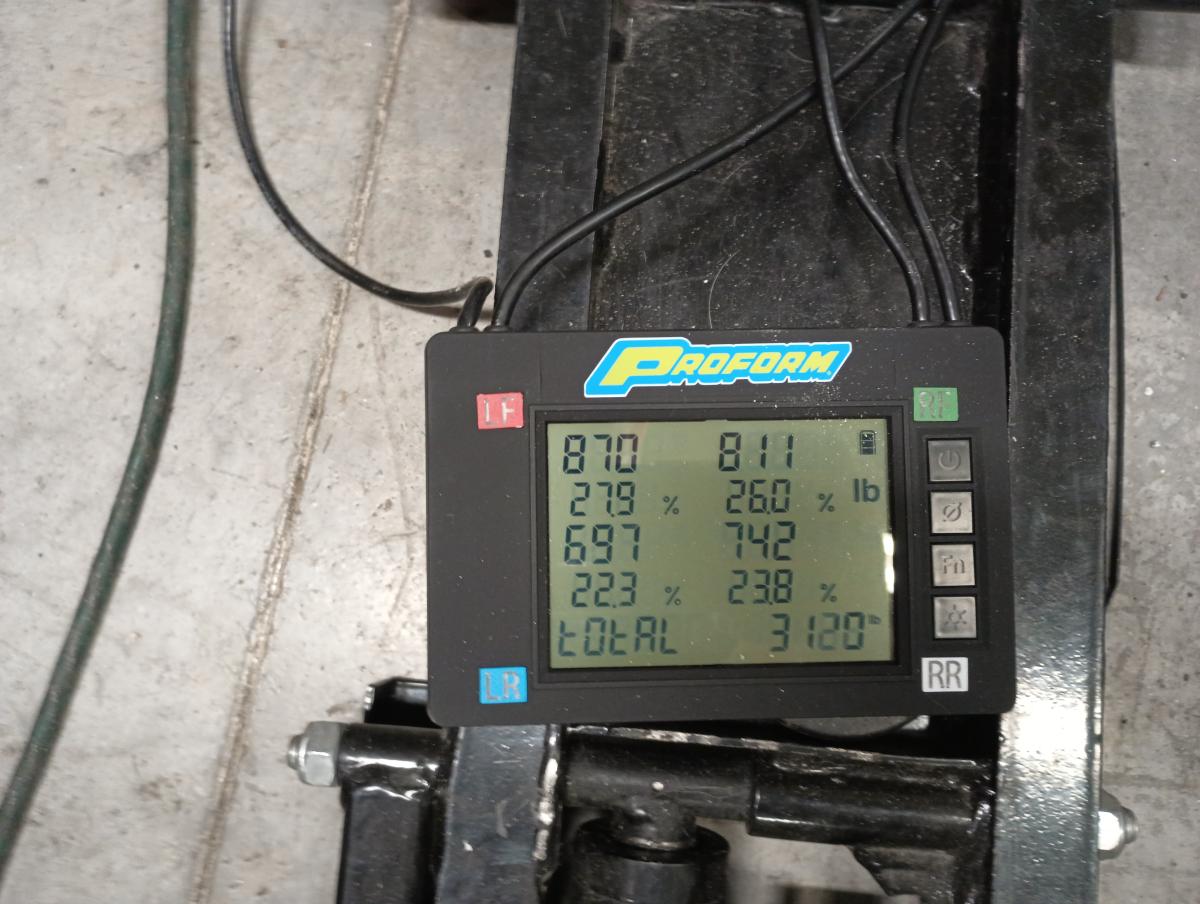
For fun, with the passenger seat removed, I weighed in the car without the glass targa top. Thie yielded a 22lb savings. That's also all fairly high up weight as well. This lends some credibility to the claim that a fiberglass top can save weight, or that perhaps swapping your tap out to Lexan could yield some notable weight savings. Maybe someday I'll do this, but for stage 1... my spray painted over glass top is just fine.
(final final picture to come as soon as I finish trim out)
So there you have it. 80-100lbs of weight savings for little to no cost and some safety improvements for your track car. There's even some additional weight savings to be had if you can ditch the carpet entirely, but I at least captured the big ticket items on the scale and documented some of the more challenging aspects of the task to possibly help you or others in the future!